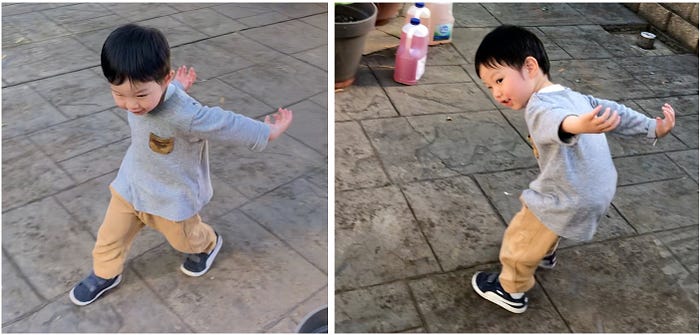
Using a pose estimation model, an object detection model built using Amazon SageMaker JumpStart, a gesture recognition system and a 3D game engine written in OpenGL running on an NVIDIA Jetson AGX Xavier, I built Griffin, a game that let my toddler use his body to fly as an eagle in a fantasy 3D world.
My wife and I have a super active 2.5-year-old boy named Dexie. He loves animals, and one of his favourites is the eagle — he often cruises around the house pretending to fly like one.
Recently, I also received an NVIDIA Jetson AGX Xavier from NVIDIA for winning the Jetson project of the month with my Qrio project, a bot that talks and plays YouTubeKids videos for Dexie. It comprises powerful hardware and a beefy GPU, which makes it the perfect hardware platform for this computationally intensive project, Griffin.
Dexie is pretending to fly like an eagle.Concept
Based on Dexie’s interests in eagles and flying, and me not being able to go anywhere during COVID-19 on our two-week Christmas break, I thought it would be cool if I could build a system or game that could give him an eagle flying experience. Furthermore, to enhance the immersion, I wanted him to be able to use his body to control the eagle body — standing on a tree branch and flapping his wings to prepare for flight using his actual arms, jumping to take off and lifting his arms side to side to steer direction during mid-flight.
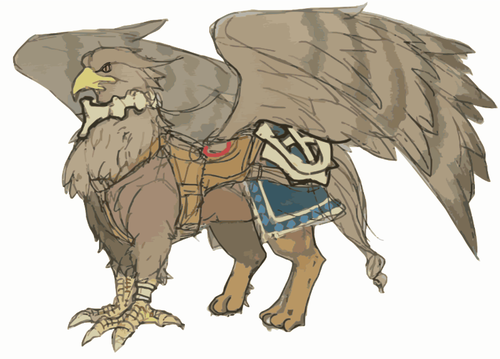
I decided to call the system Griffin, which is a mythological creature with a lion’s body and an eagle’s head.
Research
To achieve the above, Griffin needed to have the following modules:
- 3D Game Engine — to bring the 3D fantasy world with hills, mountains, blue skies and Griffin to life using a flight simulator written in OpenGL.
- Body Posture Estimation — to constantly detect the player’s body posture as an input to the system to control Griffin using the OpenPose Pose Estimation Model and an SSD Object Detection Model.
- Action Mapping and Gesture Recognition — to transform the body posture into a meaningful action and gesture, such as lifting the left/right wing, rolling the body side to side, jumping to take off, etc.
- Communication System — to send the gesture input into the 3D game engine using a socket. I will discuss later why we need this.
Here is the list of the hardware required to run the system:
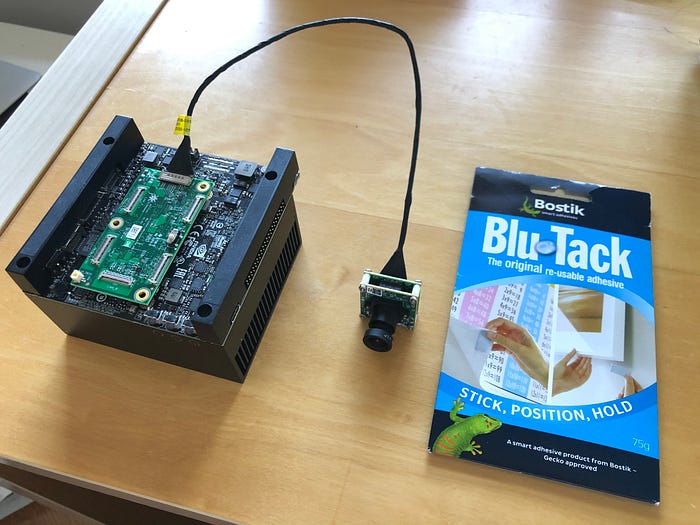
- NVIDIA Jetson AGX Xavier — a small GPU-powered, embedded device that will run all the modules above. This is the perfect device for the job because it can support video and audio output via a simple HDMI port, and it has an ethernet port for easy internet access. You can even plug in a mouse and a keyboard to develop and debug right on the device, as it has a fully functional Ubuntu 18.04 OS.
- TV (with an HDMI input and a built-in speaker) — as a display to the game engine.
- Camera — Sony IMX327. It’s an awesome, tiny, Full HD ultra-low light camera. Honestly, I could have gone for a much lower end camera, as I only need 224×224 image resolution. However, since I already had this camera for another project, then why not use it?
- Blu-Tack — to glue everything together and to make sure everything stays in place. 🙂
Implementation
It is now time to get my hands dirty and start building.
Building the 3D Game Engine
To better simulate the flying experience, the Griffin system will render the 3D world in third-person view. Imagine a camera is following right behind Griffin and looking exactly where he is looking. Why not use a single-person view like a flight simulator style? Because seeing an eagle’s wings and his arms moving in sync will help Dexie to quickly learn how to control the game and enjoy a more immersive experience.
Building one’s own 3D game engine is not an easy task and may take weeks. Most developers these days simply use a proprietary game engine such as Unity or Unreal. However, I am out of luck, as I cannot find any game engines that run on Ubuntu OS/ARM chipset. An alternative is to find an open-source flight simulator that runs purely on OpenGL. This will guarantee that it will work on AGX since it supports OpenGL ES (light version of OpenGL) and is hardware-accelerated, which is a must if you don’t want the game engine to run as slow as a turtle.
Luckily, I came across a C++ open-source flight simulator that met the criteria above. I performed the following modifications:
- I replaced the keypress-based flight control system with a target-based system. This way, I could constantly set a roll target angle for Griffin’s body to slowly roll into. This roll target later will be automatically set by a gesture recognition module by mapping the orientation of Dexie’s arms.
- I enhanced the static 3D model management to support a hierarchical structure. The original airplane model moved as one rigid body and no moving body parts. However, Griffin has two wings that need to be able to move independently of his body. For this, I added the two wings as separate 3D models attached to the body. I can still rotate each wing independently, but I can also move Griffin’s body that will indirectly move the two wings accordingly. A proper way to do this is to build a skeletal animation system and organise the body parts into a tree structure. However, since I only have three body parts to deal with (body and two wings), hacking them up does the trick. To edit the eagle and tree 3D models, I used Blender, a free and easy-to-use 3D authoring tool.
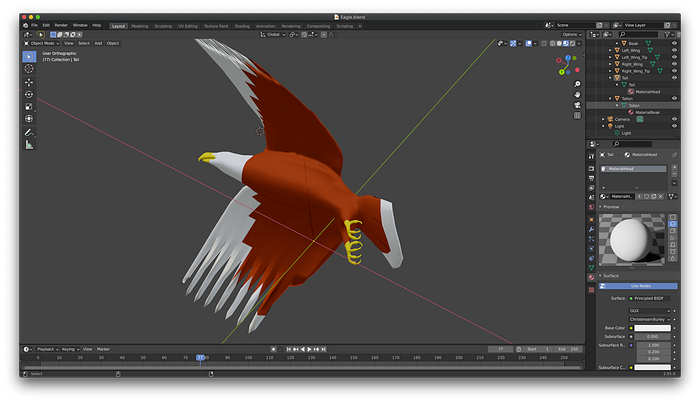
- I added a tree model for Griffin to take off from and a game state that enables restarting the game without restarting the application. There are two states for Griffin: standing, which is where Griffin is standing on a tree branch and flying.
- I added sound playback using libSFML: a screaming eagle and a looping wind sound that starts playing as soon as Griffin takes off.
Building the Body Posture Estimation
The job of this module is to constantly detect the body posture from the camera feed. Specifically, we need to know the position of the left/right elbow, left/right shoulder, neck and nose to be able to drive Griffin’s wings and body and trigger specific gestures. OpenPose is a popular open-source library with collections of AI models that estimate body posture, hand posture and even facial features. The model I am using is the body pose COCO model with resnet18 as a backbone feature extractor. This model can detect 18 joints in real time, including the 6 joints that we need above.
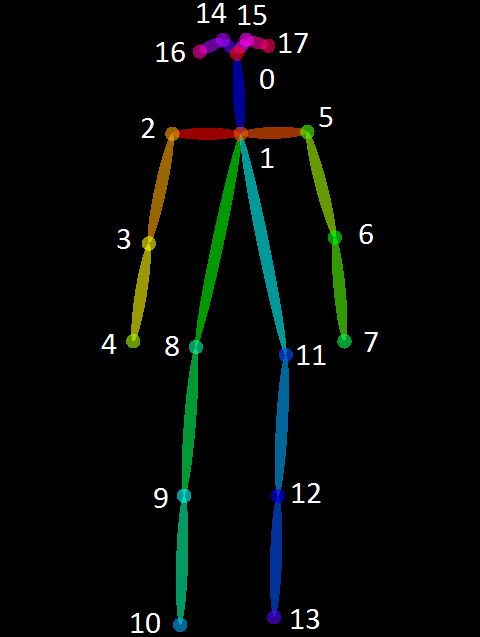
One big problem is that OpenPose is built on top of the PyTorch framework, which runs very slowly in NVIDIA AGX Xavier at 4FPS as it will not take advantage of the heavily optimised TensorRT framework. Luckily, there is an awesome tool called torch2trt that can automatically port your PyTorch model into TensorRT! The steps to install OpenPose, convert PyTorch into TensorRT and download the pre-trained resnet18 backbone model are fully explained here.
To get the video feed from the camera, I am using another awesome library called Jetcam. Within 4 lines of code, you can get the whole thing running.
from jetcam.csi_camera import CSICameracamera = CSICamera(width=224, height=224, capture_width=224, capture_height=224, capture_fps=30)
image = camera.read()
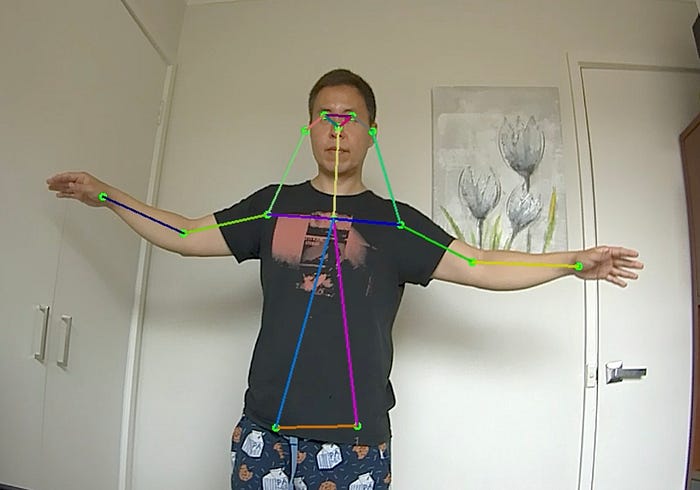
As you can see above, I got the pose estimation module running at a blazing speed of 100FPS! I am sure this can still be optimised further.
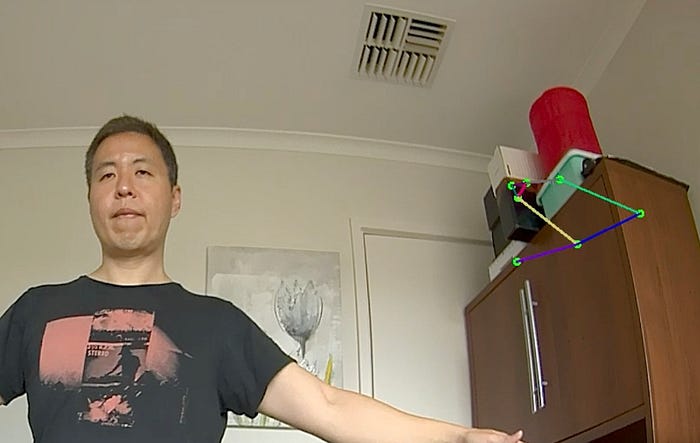
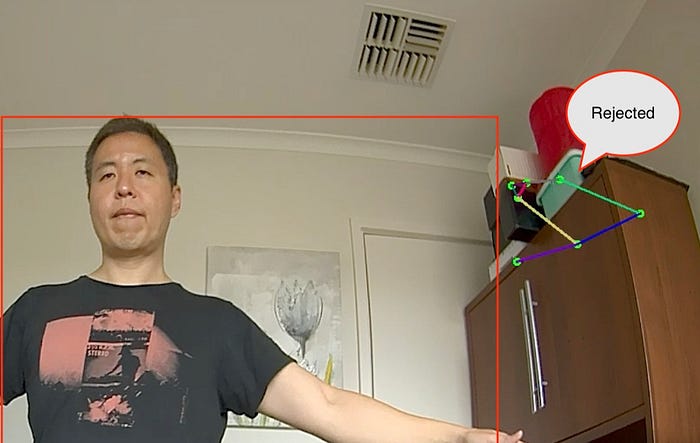
After a few test, I found that sometimes the model incorrectly identified random objects as joints (false positive) as seen in the photo below. This is enough to create trouble within Griffin’s motion control.
Building an Object Detection Model with Amazon SageMaker JumpStart
One way to fix this issue is to add a secondary AI model, an object detection to give me bounding boxes where human presence are detected. I can then exclude all detected body joints outside these boxes. As a bonus, the bounding boxes also helped me to identify the main player amongst others who are visible in the background. The closest person to the camera which is supposed to be the main player would have his/her feet (the bottom part of the bounding box) the closest to the bottom of the screen. Note that this assumption is only valid when their feet are visible.
In my past project, I trained an SSDMobileNetV2 object detection model manually. This time I used an Amazon SageMaker JumpStart, a tools AWS released just a few weeks ago to let you deploy an AI model from TensorFlowHub and PyTorchHub with one click of a button. There are 150+ available models to choose from and one of them is a fully pre-trained SSDMobileNetV2 🙂
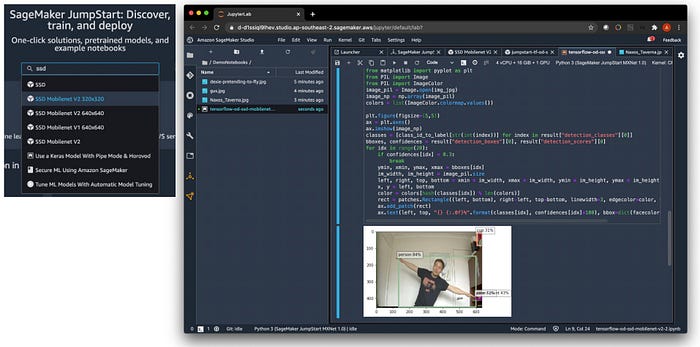
Amazon JumpStart is a feature within Amazon SageMaker Studio, an integrated development environment for AI that lets you easily build, train, debug, deploy and monitor your AI models. After I selected an SSDMobileNetV2, within a click of a button I deployed the model. Next, I opened the provided Jupyter notebook which came with inference code for me to test the model right away by calling the model endpoint which has already been built for you automatically.
If you would be deploying this model as a REST API in the cloud, your job is pretty much done without writing any code. However, as I will be deploying this model on edge, I copied the pre-trained model file created in S3 bucket to my Jetson AGX Xavier and loaded them using tf.saved_model.load function, ready for an inference call. Look, a better way is probably to compile the model using Amazon SageMaker Neo and then to deploy it using AWS IoT Greengrass directly to Jetson AGX Xavier. However due to some tensor’s naming convention, Amazon SageMaker Neo was not able to compile the SSD object detection model from JumpStart at the time of this writing, otherwise it would have been a complete end to end process.
The whole process above only took me 5 minutes. In comparison, I spent two days in my last project with all the data labelling, setting up the training code and waiting for the training to complete.
With the object detection now in place, I added the body joints outside the box exclusion logic and I saw a huge reduction in false positive. Yay!
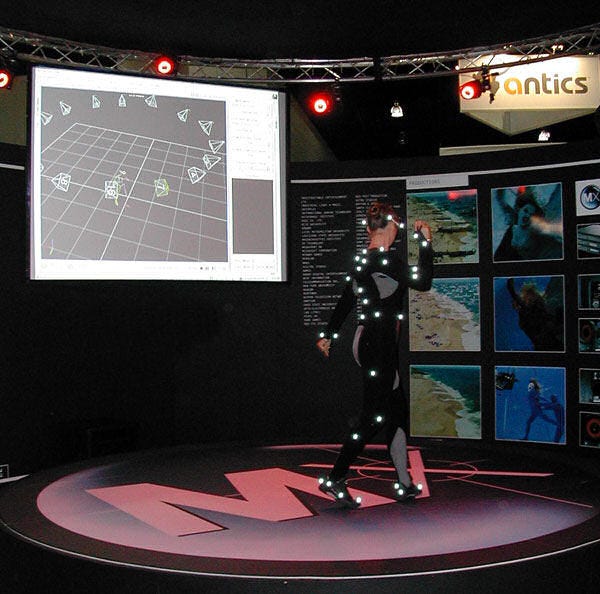
It is quite amazing what you can do today with AI. Looking back to 20 years ago when I was still a game and movie SFX developer, to do something like this, you would need motion capture hardware costing hundreds of thousands of dollars that required cameras and IR lights everywhere and reflective balls all over your body and face. Look, to be fair they are more accurate; however, it won’t be long until we can achieve the same result with AI and a $50 webcam.
Building the Action Mapping and Gesture Recognition
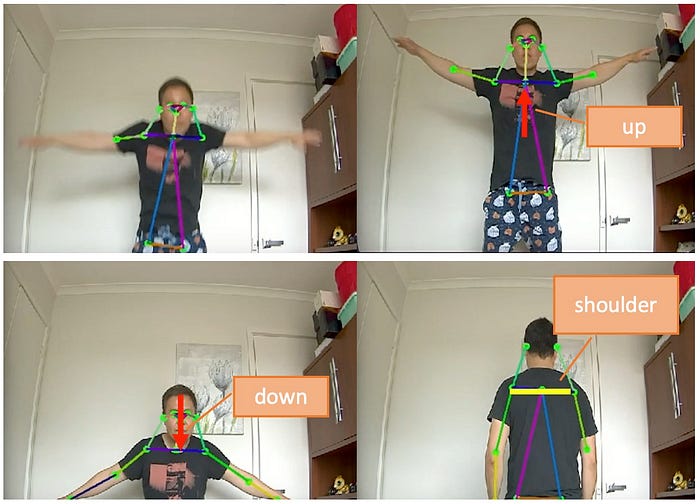
This module is crucial to translate the movement of the 6 joints detected by the pose estimation module into a more meaningful input to the game system. This consists of three direct motion mappings from the detected joints to Griffin’s movement and two gesture recognitions to trigger action.
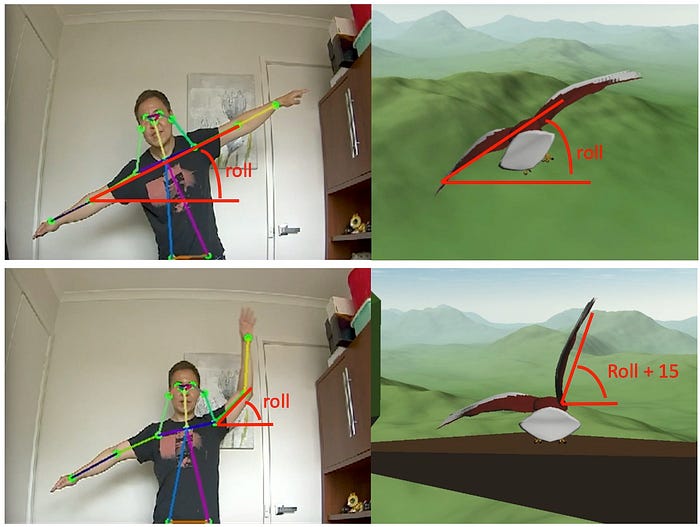
- Body roll while flying — to control the forward direction where Griffin is flying. Body roll is calculated from the angle between the horizontal axis and the right-to-left elbow vector (top photo). When flying, both wings are moving in sync using this roll angle. The elbow is chosen as opposed to the wrist to maximise visibility, as the wrist often moves outside the camera’s view or gets obstructed by other body parts.
- Wing rotation while standing — is purely a cosmetic action that serves no other purpose than to make the game more fun and give more impression of control over each wing independently while standing. It is calculated from the angle between the horizontal axis and the shoulder-to-elbow vector (bottom photo) for each wing respectively. 15 degrees are added to the final roll angle to exaggerate the wing movement as it is quite tiring to lift your arms up high for a period of time.
- Crouching is another cosmetic action to give an impression of control over Griffin’s crouching posture before the flight take off. It is calculated from the ratio between the length of the neck-to-nose vector and the shoulder vector. The further you crouch, the smaller the distance between your neck and nose whilst the distance between your left and right shoulders remains the same, which then yields a smaller ratio value. You probably wonder why I don’t simply use the neck vertical coordinate directly as a crouch offset. It is never a good idea to use the raw coordinates directly as the magnitude of the neck vertical movement depends on the distance between the person and the camera. We don’t want to wrongly trigger crouching animation when the person is moving closer to and further from the camera. Crouching animation is simply implemented by moving Griffin downwards. Ideally, I could make both legs bend; however, this would require a lot more work for little added value. I would need to detach the legs as body parts and animate them separately as I did with the wings.
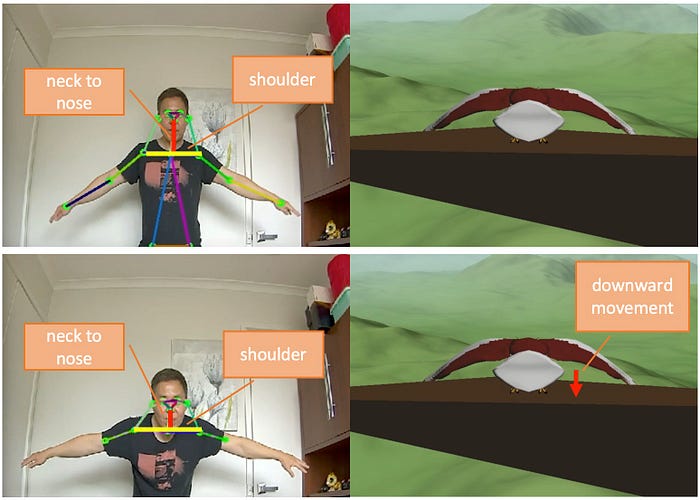
- Taking off gesture — is recognised when the centre point between the left and right shoulders moves up and down greater than a threshold within less than a second. The threshold is chosen to be the length between the shoulders. As the name implies, Griffin will jump off the tree branch and start flying when this gesture is triggered.
- Game reset gesture — is recognised when the horizontal position of the left and right shoulders is inverted. E.g., the actor is back facing the camera. The game will reset, and Griffin will be back standing on the tree, ready for the next flight, when this gesture is triggered.
Communication System
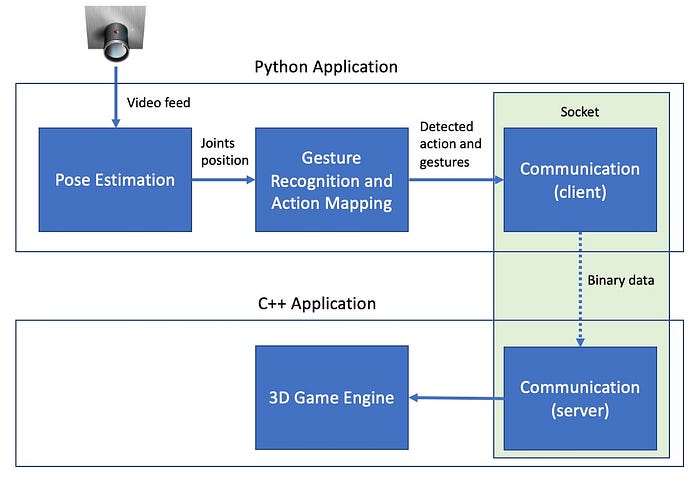
Now, with the three major components completed, we just need to glue everything together. We need to send the detected body joints from pose estimation to the gesture recognition module. It’s an easy task as they were both part of the same application written in Python. However, there is no easy way to send the mapped action and gesture to the 3D game engine as it is built as a separate application in C++. You probably wonder why I don’t just build the game engine in Python. The reason is because there is no reliable way to access OpenGL using Python. Besides, even if it were possible, I don’t want to spend weeks porting the C++ into Python code.
I need to figure out a way to pass this information between the two applications efficiently with minimum overhead. I would like to emphasise the minimum overhead requirement as this is a crucial factor for a game engine. A latency as small as 100ms between the input controller and when a relevant action takes place will easily take the immersion away. With this in mind, the best communication medium between two separate applications is via socket. It’s a low-level communication mechanism used by the TCP protocol (the backbone technology of the internet, in layman’s terms). Since the two applications reside within the same computer, the latency will be within 5ms.
In C++ we simply use the sys/socket library, whilst in Python we can use socket framework. The gesture recognition and pose estimation module, which from now on I will call the Python app, acts as a client that sends 5 pieces of information: roll_target, lwing_target, rwing_target, body_height (crouch offset) and game_state. The 3D game engine, which from now on I will call the C++ app, acts as a server that listens to and constantly receives the above information.
To map these 5 pieces of information/variables correctly from Python to C++, they are placed in a Python C-like structure before we send them away.
class Payload(Structure):
 _fields_ = [(“roll_target”, c_int32),
             (“lwing_target”, c_int32),
             ("rwing_target", c_int32),
             ("body_height", c_int32),
             ("game_state", c_int32)]
In C++ apps, they are received as a native C structure.
typedef struct payload_t
{
    int32_t roll_target;
    int32_t lwing_target;
    int32_t rwing_target;
    int32_t body_height;
    int32_t game_state;
} payload;
As you can see in the architecture diagram below, the communication layer consists of a client module, which sits within the Python application, and a server module, which sits within the C++ application.
Calibration and Testing
With everything ready to go, I set up the Griffin system in my office to perform calibration and testing. The system is performing much better than I expected, showing an overall frame rate of 60FPS while doing all the real-time 3D rendering and pose estimations. NVIDIA Jetson AGX Xavier really lives up to its reputation. You can see the calibration and test process in video below. The video may look a little bit choppy as I ran a video capture to record the Ubuntu desktop at 15FPS to minimise the performance impact to Griffin.
Showtime
Finally, it’s time for a real test by getting Dexie to take his first flight with Griffin. I set up the system in our living room with him impatiently waiting to get into action.
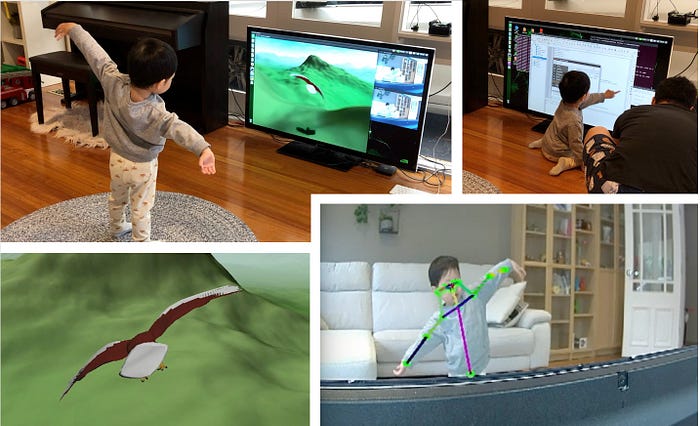
It took only one demonstration on how to control Griffin, jumping to take off and moving my arms from side to side to control the wings, for Dexie to become familiar with the system. He gathered that Griffin’s wing movement was directly in sync with my arm movement, thanks to the third-person view mode! From there on, it came very naturally, and he was on his own enjoying his flying experience. This proves that there is no better game control than your own body. Remember Steve Job’s comment in ridiculing stylus over finger when unveiling the first iPhone.
It is pretty funny that one time when Dexie was about to hit a mountain, he raised his arm so high trying to make a sharp turn. However, due to the maximum rolling angle constraint I put in place, Griffin wouldn’t let him turn any sharper and ended up crashing into the mountain. 🙂 The video below will show you all of this.
He played for a good half an hour until he was so tired and going berserk rolling his arms around like crazy. The good thing is, he had a very good sleep that night, which was a win for us. Yay! More Netflix time 🙂
Summary
I definitely learned a lot from building Griffin and had fun at the same time. Here are some of the things I learned:
- Torch2trt is an awesome tool to automatically convert a PyTorch model into TensorRT to optimise your AI model running in Jetson AGX Xavier. Many cutting-edge AI models are built in PyTorch, and porting them manually to TensorFlow is a pain in the bum.
- NVIDIA Jetson AGX Xavier is a real beast! Many people have said that you can run a computer vision model processing 30 live 1080p video streams simultaneously. Now, I really have no doubt in this.
- Amazon SageMaker JumpStart offers you a large collection of popular AI models at your disposal by making it super easy to deploy them.
- Building the 3D game engine took me back in time to my past life as a game and movie SFX developer and allowed me to refresh my rusty skills in OpenGL, C++ and trigonometry.
- I could have built Griffin in Xbox using a Unity Engine and a Kinect sensor. However, what’s the fun in that? Sometimes building from scratch is where the fun is.
- Being an eagle is quite a tiring job, especially lifting your arms for a period of time. However, a real eagle might get a lot of help from the air drag to maintain their wingspread throughout flight.
That’s it, folks. I hope you enjoyed this story.
The full source code is available here.
This article has been published from the source link without modifications to the text. Only the headline has been changed.
Source link


