[ad_1]
Geth is an implementation of a full Ethereum node written in the Go programming language. It is a command line process.
Automated builds are available for stable releases and the unstable master branch.
Binary archives are published at https://geth.ethereum.org/downloads/
You will be executing geth from the command line. Set your search PATH accordingly.
For example, my geth was installed in a sub-directory, geth-alltools-windows-amd64-1.6.5-cf87713d. I set my path as:
set PATH=%PATH%;C:\dev\ethereum\geth-alltools-windows-amd64-1.6.5-cf87713d
Creating Your Private Blockchain
Assuming our current working folder is C:\dev\ethereum, create the following 3 sub-folders:
C:\dev\ethereum\geth\data\00This folder contains the default Genesis block data.C:\dev\ethereum\geth\data\01This is the folder for the first geth node.C:\dev\ethereum\geth\data\02This is the folder for the second geth node.
The Genesis Block
The Genesis block is the root block, i.e. the first block in the blockchain.
The default genesis block can be provided in the form of a JSON file, as shown below.
Store the below JSON data in the file C:\dev\ethereum\geth\data\00\DefaultGenesis.json:
{
    "config":{
      "homesteadBlock":10
    },
    "nonce": "0x0000000000000042",
    "timestamp": "0x00",
    "parentHash": "0x0000000000000000000000000000000000000000000000000000000000000000",
    "extraData": "0x00",
    "gasLimit": "0x8000000",
    "difficulty": "0x400",
    "mixhash": "0x0000000000000000000000000000000000000000000000000000000000000000",
    "coinbase": "0x3333333333333333333333333333333333333333",
    "alloc": {}
}
Data Directories
If your data directories are not yet created, create a data directory for each node in your private blockchain.
For instance, below are two data directories for two running nodes in one machine.
C:\dev\ethereum\geth\data\01 This is the folder for the first geth node.
C:\dev\ethereum\geth\data\02 This is the folder for the second geth node.
Each data directory will therefore store an individual node’s blockchain data.
Initializing the Data Directory
Before starting up the geth nodes, their data directories must be initialized.
Below are the command lines to initialize the nodes with the default genesis data.
To initialize node 1:
geth --datadir "C:\dev\ethereum\geth\data\01" init "C:\dev\ethereum\geth\data\00\ DefaultGenesis.json"
To initialize node 2:
geth --datadir "C:\dev\ethereum\geth\data\02" init "C:\dev\ethereum\geth\data\00\ DefaultGenesis.json"
Starting Geth Node Instances
Below is the command line to start node 1. The default listening port is 30303, and the default rpc port is 8545. The ipcpath name must be a unique pipe name.
Note that –rpc and –rpccorsdomain must be specified. This is so that the geth node will accept the RPC protocol.
geth --datadir "C:\dev\ethereum\geth\data\01" --ipcpathgeth01 --nodiscover --networkid 1234 --rpc --rpccorsdomain "*" console 2> "C:\dev\ethereum\geth\data\01\console.log"
For node 2, the listening port 30304 and the rpc port must be explicitly specified.
geth --datadir "C:\dev\ethereum\geth\data\02" --ipcpathgeth02 --port 30304 --nodiscover --networkid 1234 --rpc --rpcport 8546 --rpccorsdomain "*" console 2> "C:\dev\ethereum\geth\data\02\console.log"
Attaching to Geth Node Instances
With both nodes started up, they are running as a server process, waiting for events and commands to be executed. You should not interrupt the server process by entering commands in its console window. Instead, you should send commands to it from another client process.
This is achieved by starting another geth process as a client and connecting it to the geth server process.
Once attached, you can then send interactive commands to the server process. You can do this by first attaching your geth client to a geth server process.
This command line attaches to geth node 1 via namepipe:
geth attach ipc:\\.\pipe\geth01
Attaching to geth node 2 via namepipe:
geth attach ipc:\\.\pipe\geth02
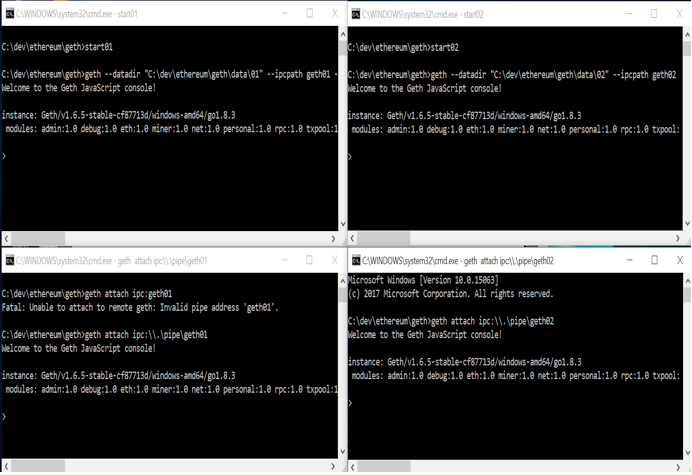
Below are four screenshots, where the top two console windows are geth server processes and the bottom two console windows are the geth clients.
Adding Peer Nodes Manually
The two running nodes do not know each other even though we have specified that they are in the same network, with id 1234. For now, we are not bootstrapping nodes on startup, i.e. not configuring known static nodes on startup. We will add a peer node manually.
To get the node information of node 1, enter the function admin.nodeInfo from the node 1 client console:
> admin.nodeInfo
{
  enode: "enode://b71b3f6e23f33a07d30b862dd53f3364e46057b85183b4d0d856a4f7…831ab@[::]:30303?discport=0",
To get the node information of node 2, enter the function admin.nodeInfo from the node 2 client console:
> admin.nodeInfo
{
  enode: "enode://deb200d8ea9c67dd9675b920072145576311d20cb229e80e544…eb7a131ee@[::]:30304?discport=0",
...
In node 1, you can add node 2 by using the admin.addPeer function by specifying the entire enode data of node 2 as below. This function will return “true”:
>admin.addPeer("enode://deb200d8ea9c67dd9675b920072145576311…b8eb7a131ee@[::]:30304?discport=0")
true
>
Once added, both nodes will recognize each other. You can verify this using the admin.peers function.
From node 1:
> admin.peers
[{
    caps: ["eth/63"],
    id: "deb200d8ea9c67dd9675b920072145576311d20cb229e80e….3b9cbbf580ca261f85c3c642fbb7b8eb7a131ee",
From node 2:
> admin.peers
[{
    caps: ["eth/63"],
    id: "b71b3f6e23f33a07d30b862dd53f3364e46057b85183b4…db399c0c227ec9158512a5a8e2d883efab7831ab",
Add a New Account
We have to add our first account to the blockchain of node 1 so that the account can be used for executing transactions. This is the External account, owned by a person.
From node 1, enter the function personal.newAccount and provide your password. This function will return the address of the newly created account.
> personal.newAccount(<".....you password here.....">) "0x4799c873f6574b299854bfd831ae99ad2e664e30“
The string of numbers and letters is the address of the new account in node 1.
Important: There is no way to restore your account if you forget your password. Never forget your password. Keep it in a safe place, and do not store it on your machine.
Eventual Consistency
Below is a demonstration of eventual consistency between the two nodes.
Start mining on node 1 by using the function miner.start(1), where 1 refers to the number of threads. Note that the miner.start(n) function will always return “null.” Unless you have many CPU cores, keep the thread number low to avoid high CPU usage. Note that mining without any pending transaction can still earn your default account incentive (ETH). It creates empty blocks, thus strengthening the integrity of the blockchain tree.
> miner.start(1)
null
> eth.blockNumber
8
> eth.blockNumber
8
> eth.blockNumber
9
> eth.blockNumber
10
...
Stop mining on node 1 by using the function miner.stop(). This function returns “true”:
> miner.stop()
true
Both nodes will have the same number of blocks in their blockchain.
From either node, as shown below, you can query the number of blocks by using the function eth.blockNumber.

Both nodes will get the same block per block number, e.g. hash shown below, being mined by node 1:
> eth.getBlock(30)
{
  difficulty: 132864,
  extraData: "0xd983010605846765746887676f312e382e338777696e646f7773",
  gasLimit: 130340787,
  gasUsed: 0,
  hash: "0xab2afb75d7082e0f62432ed518e6596643e158343c83af4a6b20f60a08480f75",
  logsBloom: "0x0000000000000000000000000000000000…00000000000000000000000000000000000000000000000",
  miner: "0x4799c873f6574b299854bfd831ae99ad2e664e30",
Alternatively, you can pass in the last block number to the eth.getBlock function and get the miner address directly:
> eth.getBlock(eth.blockNumber).miner
"0x4799c873f6574b299854bfd831ae99ad2e664e30"
For any node to start mining, it requires an external account.
Hence, we now add a new external account in node 2’s client console:
> personal.newAccount(<"…your password here…">)
"0x5be060fa31a851a20a4739dc8d45619f6d292461"
The string of numbers and letters is the address of the new account in node 2. Once again, there is no way to restore your account if you forget your password. Keep it in a safe place, not stored on your machine.
Node 2 can start mining as per node 1. Effectively, both nodes can now compete to mine new blocks.
While both nodes have been issued the miner.start(1) function, you can query the last block’s miner from either the node 1 client or node 2 client console:
> eth.getBlock(eth.blockNumber).miner
"0x5be060fa31a851a20a4739dc8d45619f6d292461"   mined by node 2 account
> eth.getBlock(eth.blockNumber).miner
"0x5be060fa31a851a20a4739dc8d45619f6d292461"
> eth.getBlock(eth.blockNumber).miner
"0x5be060fa31a851a20a4739dc8d45619f6d292461"
> eth.getBlock(eth.blockNumber).miner
"0x4799c873f6574b299854bfd831ae99ad2e664e30"   mined by node 1 account
> eth.getBlock(eth.blockNumber).miner
"0x4799c873f6574b299854bfd831ae99ad2e664e30"
Browser-Solidity: Preparing Your First Smart Contract
Solidity is the programming language used to write smart contract codes.
Browser-Solidity is a Web IDE environment to write smart contract codes, as well as compile and deploy them to your geth nodes.
You can download the built version from https://github.com/ethereum/browser-solidity.
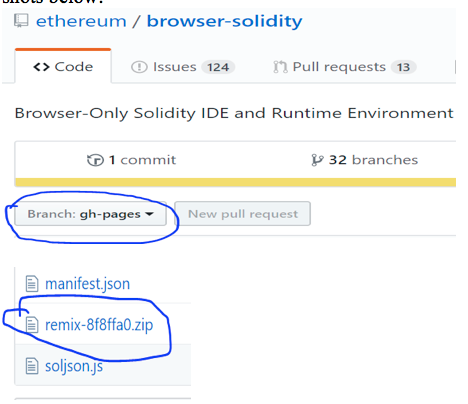
From the Branch drop-down button, select “gh-pages” and download the zip file. See the screen shots below.
Building Browser-Solidity From Source
You may want to build Browser-Solidity if you find that the above downloaded zip does not work as expected. For example, there was a bug concerning “Gas Limit” and the fix may not have made it to the published zip file. The latest source would have contained the fix.
I manually built from the master by following the README.md instructions in the Master Branch.
The pre-requisites to build are to have npm and Node.js installed on your machine.
Refer to https://docs.npmjs.com/getting-started/installing-node, and then the following steps (assuming my working directory is C:\dev\ethereum):
* git clone https://github.com/ethereum/browser-solidity
* cd browser-solidity
* npm install – fetches dependencies and executes npm run prepublish to build the application.
Starting Browser-Solidity
To start Browser-Solidity, run npm start and open in your browser as shown below (assuming Browser-Solidity has been git cloned and built in the directory C:\dev\ethereum\browser-solidity):
cd C:\dev\ethereum\browser-solidity
C:\dev\ethereum\browser-solidity>npm start
> [email protected] start C:\dev\ethereum\browser-solidity
> npm-run-all -lpr serve watch onchange
[serve   ]
[serve   ] > [email protected] serve C:\dev\ethereum\browser-solidity
[serve   ] > execr --silent http-server .
...
[onchange] > [email protected] lint C:\dev\ethereum\browser-solidity
[onchange] > standard | notify-error
[onchange]
[onchange] standard: Use JavaScript Standard Style (http://standardjs.com)
[onchange]   C:\dev\ethereum\browser-solidity\src\app.js:61:7: 'settingsView' is assigned a value but never used.
[onchange]   C:\dev\ethereum\browser-solidity\src\universal-dapp.js:287:5: Move function declaration to function body root.
Now open in your browser.
Alternatively, you can also open C:\dev\ethereum\browser-solidity\index.html directly in your browser.
Your First Smart Contract
This section describes the steps to write and deploy a simple smart contract to node 1.
A sample code of a Solidity smart contract named BillPayment.sol is given below. You can save it locally and open it from Browser-Solidity.
pragma solidity ^0.4.0;
/**
 * A new contract instance is created for a new customer.
 * Every customer has an unique instance of this contract.
 * Payment is made using the address of the instance of this contract.
 */
contract BillPayment {
    string public customerId;
uint public contractAmount;
uint public payment;
uint public balance;
bool public completed;
    /**
     * Constructor
     */
    function BillPayment(string _customerId, uint _contractAmount) public {
        customerId = _customerId;
  contractAmount = _contractAmount;
  balance = _contractAmount;
    }
    /**
     * Running node receives payment for this customer contract instance.
    */
    function receivePayment(uint _payment) public {
        if (isCompleted()) return;
  payment = _payment;
  balance -= payment;
  if (balance <= 0) {
balance = 0;
completed = true;
  }
    }
    /**
     * Get the customer ID.
     */
    function getCustomerId() constant returns (string) {
        return customerId;
    }
    /**
     * Get the contract amount.
     */
    function getContractAmount() constant returns (uint) {
        return contractAmount;
    }
    /**
     * Get the outstanding balance yet to be received.
     */
    function getBalance() constant returns (uint) {
        return balance;
    }
    /**
     * Get the last payment received.
     */
    function getPayment() constant returns (uint) {
        return payment;
    }
    /**
     * Indicates if contract is fully received.
     */
    function isCompleted() constant returns (bool) {
return completed;
    }
}
Deploy Your First Smart Contract
Open the BillPayment.sol smart contract code file from Browser-Solidity using the file open icon. Please note that you will need to be connected to the Internet, because Browser-Solidity will attempt the retrieve the latest solidity compiler.
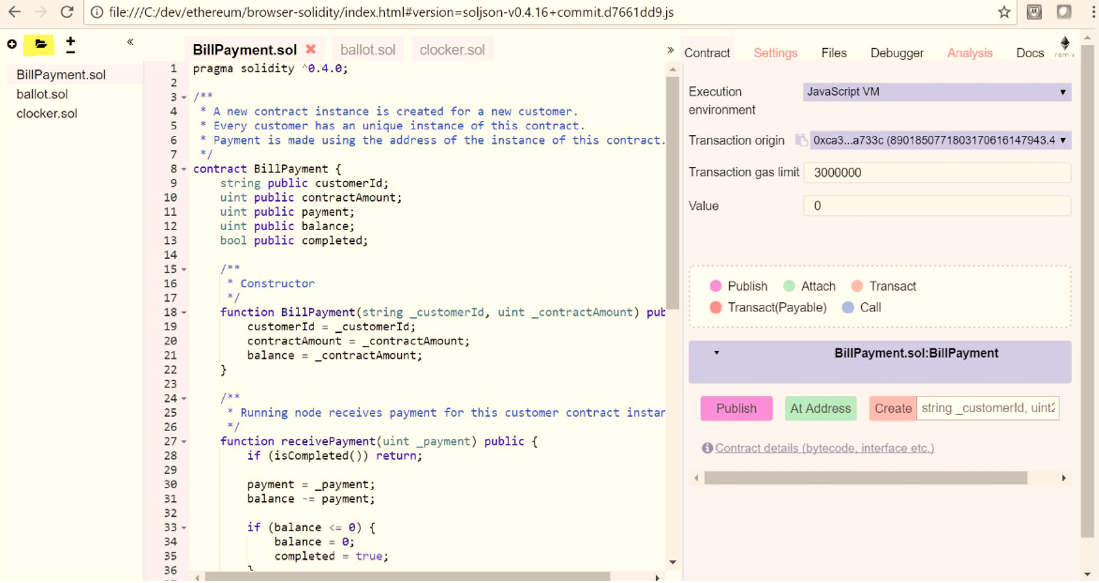
To deploy the smart contract to node 1, change the Execution environment drop-down selection to “Web3 Provider” as shown below. Accept the default Web3 Provider endpoint as

Once switched, it uses the first account address for transaction execution (see Transaction origin).
Create Your First Smart Contract Instance
Our BillPayment smart contract constructor requires two parameters: the _customerId string and _contractAmount integer. To create an instance, you can provide these values in the textbox shown below, then click on the Create button.

Notice the authentication Error message as displayed below. To create a new instance, you will have to provide the account address and its password.

From the node 1 client console, enter eth.accounts. This function will return a list of accounts, which we created earlier (in this case, we created only one external account).
> eth.accounts
["0x4799c873f6574b299854bfd831ae99ad2e664e30"]
We will unlock this account with its password in quotes ” ” using the personal.unlockAccount function.
> personal.unlockAccount(eth.accounts[0], <"...your password...">)
true
Once unlocked, click on the Create button again.

Now the new message “Waiting for transaction to be mined…” appears. Although our geth server processes for node 1 and node 2 are up and running, they are not actively mining any transaction(s). You can pass in parameters when starting the geth server so that mining threads are also started automatically.
To better understand blockchain mechanisms, we will do this manually and interactively. Follow the next section on “Mining your first Blockchain Transaction.”
Mining Your First Blockchain Transaction
This section will describe the steps to mine a blockchain transaction manually.
First, let’s query our pending transaction using the eth.pendingTransactions function.
From the node 1 client console, enter eth.pendingTransactions. It will return a list of transactions:
> eth.pendingTransactions
[{
    blockHash: null,
    blockNumber: null,
    from: "0x4799c873f6574b299854bfd831ae99ad2e664e30",
    gas: 506756,
    gasPrice: 18000000000,
    hash: "0xf325f2a17457151132975236734bb8c6a0f387c9feee4e05c325a7f99afa14fe",
    input: "0x6060604052341561000f57600080fd5b6040516106a03803806106a083398101…46101bc5780639d9…",
    nonce: 16,
    r: "0xf3800b099aaad5a4197eaca1dbff0dcc16b9ddc0f46a95bdd591ac4698bd8be9",
    s: "0x884d4e4995beedb7844b4a7060c24c917804f54597d2fce02f3f6e82a71c55a",
    to: null,
    transactionIndex: 0,
    v: "0x1b",
    value: 0
}]
>
Now enter miner.start(1), where 1 is the number of threads used for mining transactions.
Query eth.pendingTransactions again. If it returns an empty list [], it means the above transaction has been mined. Issue the miner.stop() function to stop mining.
> miner.start(1)
null
…
> eth.pendingTransactions
[]
> miner.stop()
true
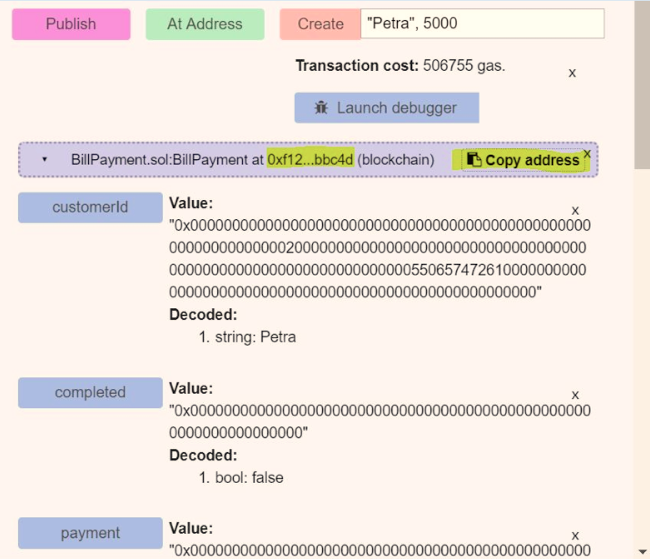
Notice that Browser-Solidity will refresh, with the BillPayment contract address displayed (see highlight below).
Again, we are doing these steps manually to demonstrate the procedures involved.
The first thing to do is to click on the ‘Copy address’ button to copy the Contract address “0xf125233002884fd827947d21b1fa377d4b6bbc4d.” Save this address in a text file for later use.
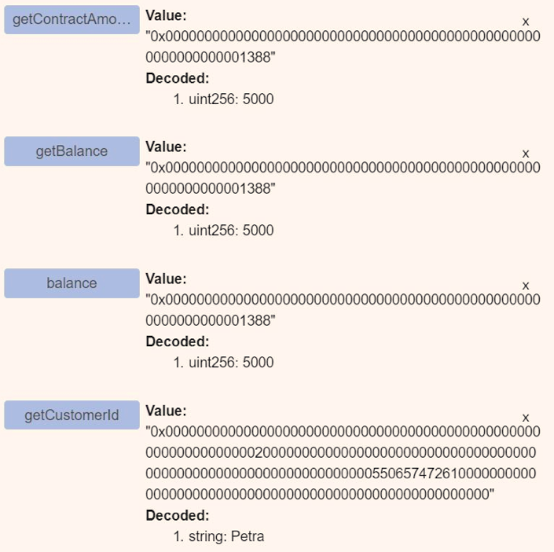
In Browser-Solidity, scroll until you see that the values of the contract instance properties initialized (as shown below).
Changing the State of a Contract Instance
Let us now try to change or update the state data of our contract instance.
Our BillPayment contract has a receivePayment function that accepts an integer amount.
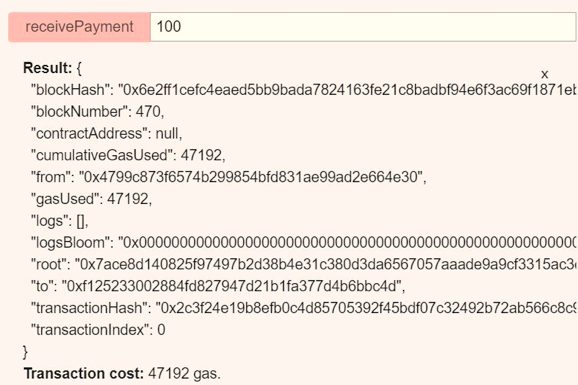
From Browser-Solidity, scroll to the receivePayment function and enter 100 in its textbox and click on the function button.

An authentication error is displayed again because changing the state of a smart contract instance will trigger a new transaction. You can unlock the account using the function personal.unlockAccount again (refer to the section, “Create Your Smart First Contract Instance”).
> personal.unlockAccount(eth.accounts[0], <"...your password...">)
true
Upon successfully unlocking your account, there is a transaction waiting to be mined again (see highlighted message above).
From the node 1 client console, you can query the pending transaction as shown:
> eth.pendingTransactions
[{
    blockHash: null,
    blockNumber: null,
    from: "0x4799c873f6574b299854bfd831ae99ad2e664e30",
    gas: 47193,
    gasPrice: 18000000000,
    hash: "0x2c3f24e19b8efb0c4d85705392f45bdf07c32492b72ab566c8c9feee31a8ced0",
    input: "0xe2eab4830000000000000000000000000000000000000000000000000000000000000064",
    nonce: 17,
    r: "0x91b6ac27df4d9ef372e1d28287e9f5f636fce6a62b23a015b0be9a98c41b83a",
    s: "0x6b148b18a7bfc814c3440757a7d8095fdf30821013fed8d35427f0e638a8732a",
    to: "0xf125233002884fd827947d21b1fa377d4b6bbc4d",
    transactionIndex: 0,
    v: "0x1c",
    value: 0
}]
To mine the transaction, enter the miner.start(1) function. Once successfully mined, stop the mining using miner.stop().
> miner.start(1)
…
> eth.pendingTransactions
[]
> miner.stop()
These are similar to the steps described in the section, “Mining Your First Blockchain Transaction.”
After the transaction is mined, Browser-Solidity will refresh with the result of the new block as shown below.
The contract states are also updated. Scroll and click on the getter functions to refresh their values (see highlights below).
Retrieving an Instance of a Contract
You have created an instance of a smart contract in Browser-Solidity. This section describes how you can retrieve it to query or update its state values.
Previously, at the end of “Mining Your First Blockchain Transaction,” you copied the address of the contract (e.g. in my example, the contract address is “0xf125233002884fd827947d21b1fa377d4b6bbc4d”).
In Browser-Solidity, scroll to the section below.
From the Interface textbox, copy the ABI.
ABI stands for Application Binary Interface. This is the interface between solidity contracts and the EVM (Ethereum Virtual Machine). The interface contains the properties and method signatures of a contract.
You can retrieve the contract instance using the contract address and its ABI.
From the node 1 client console, paste the ABI to a variable shown below.
> var abi = [{"constant":true,"inputs":[],"name":"getBalance","outputs
……………………
…:"nonpayable","type":"constructor"}]
Set the address variable from your copied/saved contract address.
> var myContractAddr = "0xf125233002884fd827947d21b1fa377d4b6bbc4d"
Undefined
Now, retrieve your contract using the below functions.
> var myContract = eth.contract(abi).at(myContractAddr)
Undefined
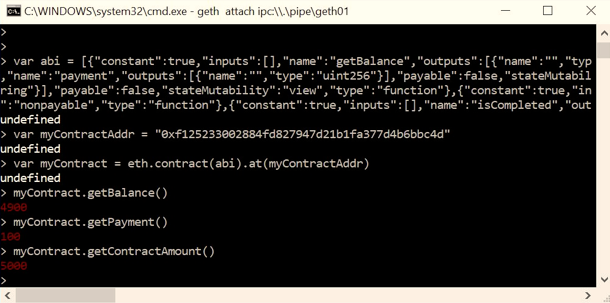
Finally, you can query the states of your contract instance as shown below. Note that read-only functions do not create any transactions as they do not change state.
> myContract.getBalance()
4900
> myContract.getPayment()
100
> myContract.getContractAmount()
5000
The screenshot below shows the function statements in the node 1 client console in its entirety.
Create a Transaction From Another Node
This section describes and demonstrates that mining nodes in your private blockchain network is synchronized and that it competes for mining transactions. Again, we will show this manually by:
- Creating a transaction from node 2.
- Mining the transaction from node 1.
- Verifying the result from node 2.
From both the node 1 and node 2 client consoles, which are attached to their respective server processes, enter the command functions shown in the screenshot below.
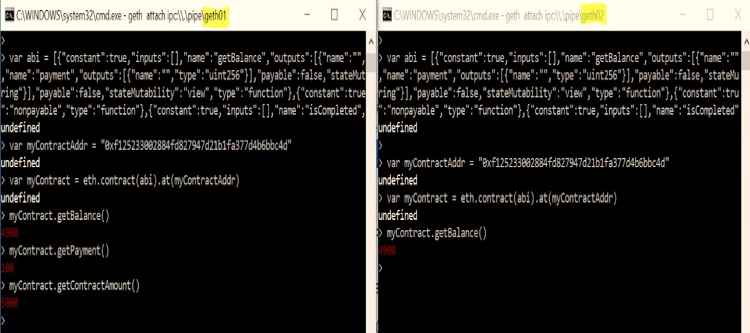
Both nodes retrieve the same instance of a smart contract, and both nodes have the same contract balance amount (using the getBalance() function).
Create a Transaction From Node 2
We use node 2 to receive a payment of 200 via the smart contract function, receivePayment(). Note that the receivePayment() function can accept a second parameter for the account address that is used to create this transaction. (Note that you can also set web3.eth.defaultAccount = "<…account address…>“, after which you can just call receivePayment(200) with one parameter.)
The authentication error is highlighted and we resolve it by unlocking the account with its password.
Error: authentication needed: password or unlock
at web3.js:3104:20
at web3.js:6191:15
at web3.js:5004:36
at web3.js:4061:16
at apply (<native code>)
at web3.js:4147:16
    at <anonymous>:1:1
> personal.unlockAccount(eth.accounts[0], <"...your password...">)
true
We call the receivePayment() function again, and this time it successfully returns a transaction hash value, “0x42…,” as shown below.
> myContract.receivePayment(200, {from:eth.accounts[0]})
"0x42bdf8d4ee6bc3ad7189989c0b266cdea9695a0865b10ecf6348f3493d5ab69c"
>
You can verify this transaction hash by looking at the hash value from the pending transactions.
> eth.pendingTransactions
[{
    blockHash: null,
    blockNumber: null,
    from: "0x5be060fa31a851a20a4739dc8d45619f6d292461",
    gas: 90000,
    gasPrice: 18000000000,
    hash: "0x42bdf8d4ee6bc3ad7189989c0b266cdea9695a0865b10ecf6348f3493d5ab69c",
    input: "0xe2eab48300000000000000000000000000000000000000000000000000000000000000c8",
    nonce: 1,
    r: "0x9105c46414ecd30d5008f7e42c3757bbeffa4dfc88c19cbc41b6fbc93d85f639",
    s: "0x51b9229643e7c39eefaca0fa7d04f4698529239a74c38a695e215ce4d2a409ee",
    to: "0xf125233002884fd827947d21b1fa377d4b6bbc4d",
    transactionIndex: 0,
    v: "0x1c",
Node 2 has now created the transaction, and is waiting to be mined.
Mine the Transaction From Node 1
Since the transaction is created by node 2, it is pending only on node 2, not node 1. The screenshot below demonstrates this.
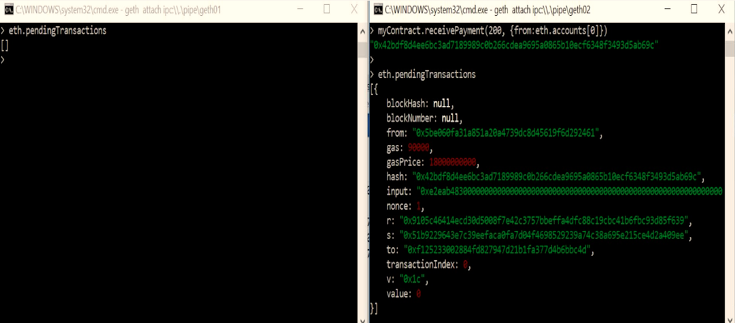
However, any node in the same private blockchain network can compete to mine the transaction. To demonstrate this, we let node 1 do the mining by issuing miner.start(1) on node 1.
> miner.start(1)
null
Verify the Results Using Node 2
Once node 1 has mined the transaction, we can verify the result in node 2.
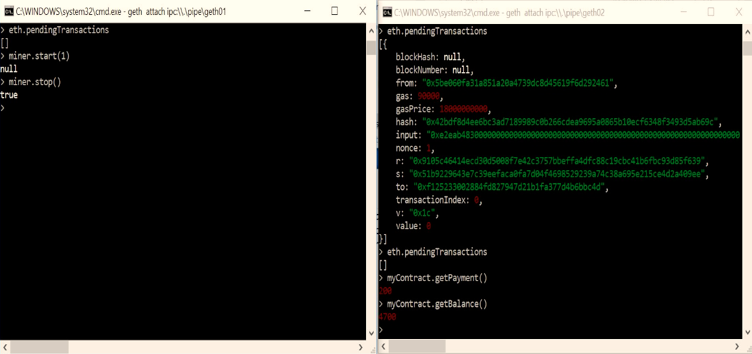
From the node 2 client console, we check that its pending transaction is gone (check again by using eth.pendingTransactions), and we verify the expected values of the last payment and remaining balance of our contract (using our smart contract functions getPayment() and getBalance() respectively) are indeed correct.
> eth.pendingTransactions
[{
    blockHash: null,
    blockNumber: null,
    from: "0x5be060fa31a851a20a4739dc8d45619f6d292461",
    gas: 90000,
    gasPrice: 18000000000,
    hash: "0x42bdf8d4ee6bc3ad7189989c0b266cdea9695a0865b10ecf6348f3493d5ab69c",
    input: "0xe2eab48300000000000000000000000000000000000000000000000000000000000000c8",
    nonce: 1,
    r: "0x9105c46414ecd30d5008f7e42c3757bbeffa4dfc88c19cbc41b6fbc93d85f639",
    s: "0x51b9229643e7c39eefaca0fa7d04f4698529239a74c38a695e215ce4d2a409ee",
    to: "0xf125233002884fd827947d21b1fa377d4b6bbc4d",
    transactionIndex: 0,
    v: "0x1c",
    value: 0
}]
> eth.pendingTransactions
[]
> myContract.getPayment()
200
> myContract.getBalance()4700
>TIP: For any other node to mine a transaction, admin.peers must reflect the nodes are in the same network. If you have re-started your system, use admin.addPeer to add your node to the current peer again.
The final screenshot below shows node 1 and node 2 in their entirety.
[ad_2]
This article has been published from the source link without modifications to the text. Only the head line has been changed.


