Computer vision has the potential to revolutionize the world. So far, computer vision has helped humans work toward solving lots of problems, like reducing traffic gridlock and monitoring environmental health.

Historically, in order to do computer vision, you’ve needed a really strong technical background. After reading this post, you should have a good understanding of computer vision without a strong technical background and you should know the steps needed to solve a computer vision problem.
What is computer vision?
In a basic sense, computer vision is the ability for a computer to see and understand what it sees in a similar way to humans.
When you want to take a drink from a glass of water, multiple vision-related things happen:
- You have to recognize that the thing in front of you is a glass of water.
- You have to know where your arm and the glass are, then move your arm in the direction of the glass.
- You have to recognize when your hand is close enough to properly grab the glass.
- You have to know where your face is, then pick up the glass and move it toward your face.
Computer vision is the same thing… but for computers!
Computer vision problems fall into a few different buckets. This is important because different problems are solved with different methods.
What are the different types of computer vision problems?

There are six main types of computer vision problems, four of which are illustrated in the above image.
- Classification: Categorizing each image into one bucket. For example, if you had a stack of 100 images that each contain either one cat or one dog, then classification means predicting whether the image you hold is of a cat or a dog. In each image, there is only one object you care about labeling – your computer wouldn’t identify that two dogs are in an image or that there’s a cat and a dog – just that an image belongs in the “dog” bucket or the “cat” bucket. A real-world example of classification is for security purposes: using video footage and computer vision to detect whether there is a potential intruder in the image. Below we show a different example: a VGG16 model correctly predicts a schoolbus.

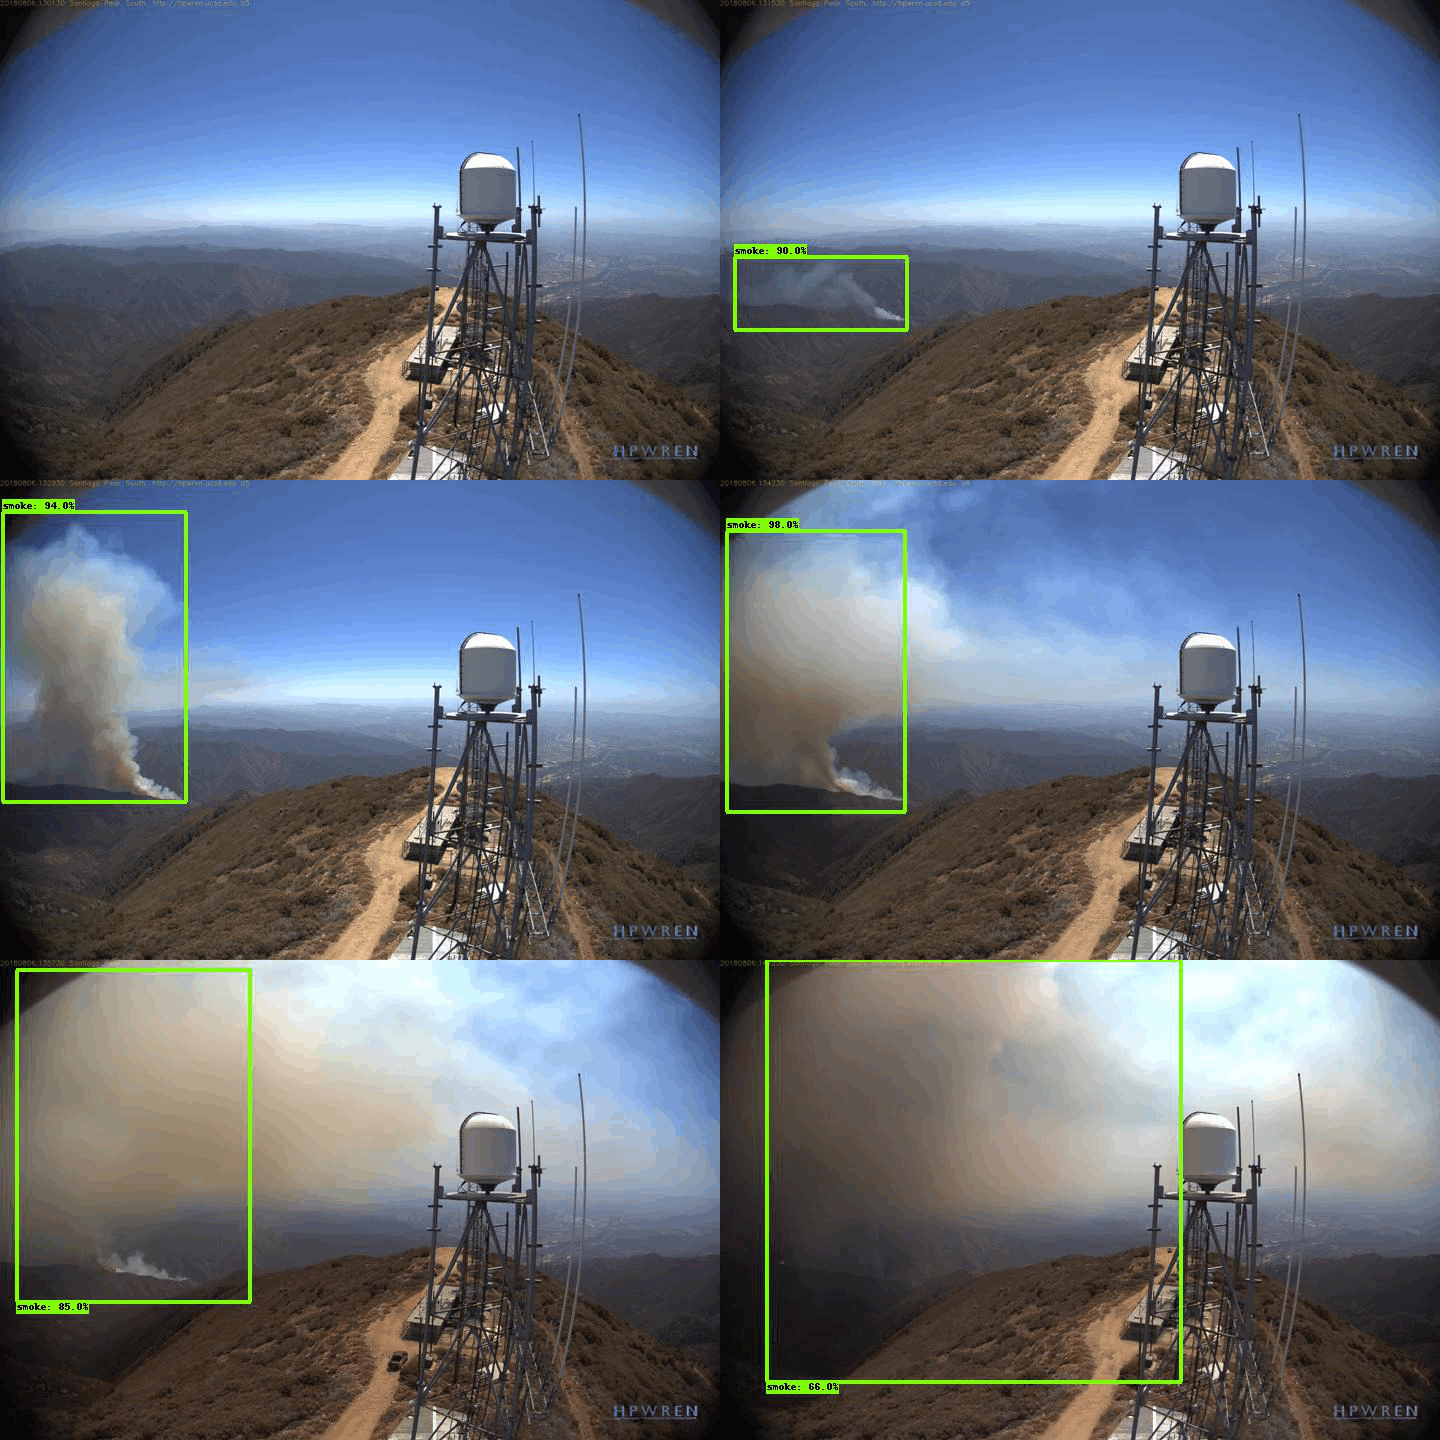
- Classification+Localization: Categorizing each image into one bucket and identifying where the object of interest is in the frame. For example, if you had a stack of 100 images that contain either one dog or one cat, then your computer would be able to identify whether the image contains a dog or cat and where in the image it is. In each image, there is only one object you care about labeling. In localization, the computer identifies where that object is using something called a bounding box. A real-world example of classification+localization is scanning and detecting whether there is a leak in a pipeline and, if so, where that leak is. Another example is using computer vision to fight wildfires by detecting smoke and attempting to douse it with water from a drone before the fire gets out of control.

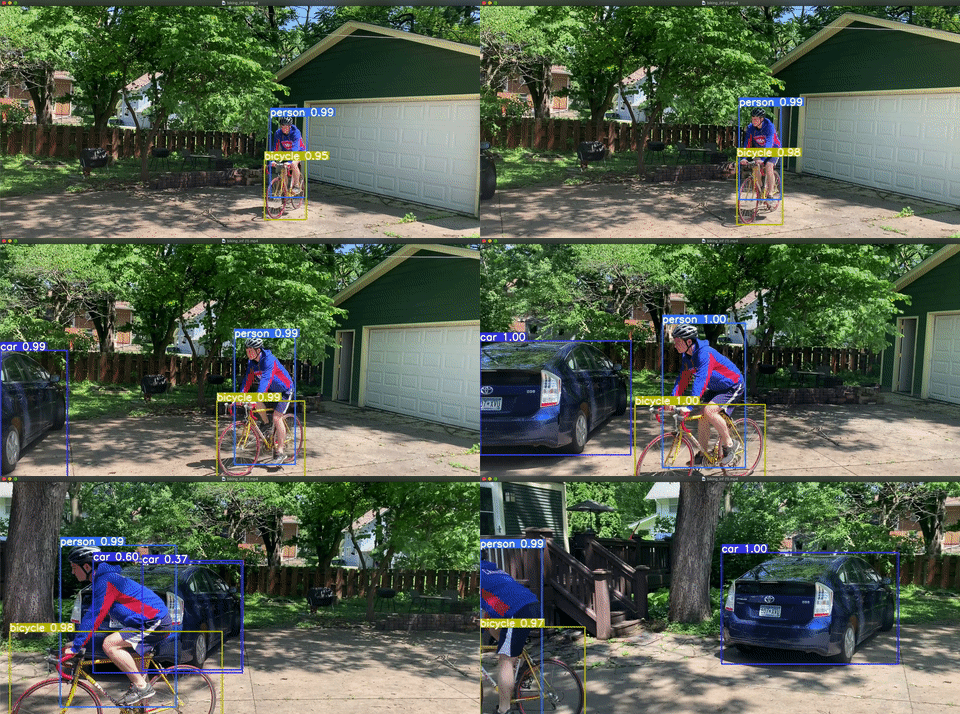
A gif of wildfire smoke being detected. - Object Detection: Identifying where an object of interest is, for any object of interest. For example, if you had a stack of 100 images and each is a family photo with pets, then your computer would identify where the humans and the pets were in each image. Images can contain any number of objects; they aren’t limited to only one. A real-world example of object detection is using computer vision to assess cancer by detecting red blood cells, white blood cells, and platelet levels.

- Semantic Segmentation: Detecting the set of pixels belonging to a specific class of object. This is like object detection, but object detection places a bounding box around the object, while semantic segmentation tries to more closely identify each object by assigning every pixel into a class. This is a good solution for any computer vision problem that requires something more delicate or specific than a bounding box. The image below is an example of semantic segmentation. A real-world example might be most medical imaging purposes – it isn’t enough to put a bounding box around the heart or a lung, but instead we want to be able to isolate the heart from the lung with a fine boundary. This article is a fantastic deep dive into semantic segmentation and was inspiration for the real-world example mentioned.

- Instance Segmentation: Very similar to semantic segmentation but differentiates between objects in the same class. In the image above, there appear to be three people and three bicycles. Semantic segmentation classifies each pixel into a class, so each pixel falls into the “person,” “bicycle,” or “background” bucket. With instance segmentation, we aim to differentiate between classes of objects (person, bicycle, background) and objects within each class – e.g. tell which pixel belongs to which person and which pixel belongs to which bicycle.
- Keypoint Detection: Also called landmark detection, this is an approach that involves identifying certain keypoints or landmarks on an object and tracking that object. On the left side of the image below, notice that the stick-like image of the human is color-coded and important locations (these the the keypoints/landmarks!) are identified with a number. On the right-hand side of the image we notice that each human matches up with a similar stick. In keypoint detection, the computer attempts to identify those landmarks on each human. This article goes in more detail about keypoint detection.

How do I solve computer vision problems?
If you want your computer to help you solve any problem with data, you usually follow a series of steps. The same is true for computer vision problems, except the steps look a little different.

We’ll walk through each of these steps, with the goal being that at the end of the process you know the steps needed to solve a computer vision problem as well as a good overview of computer vision.
- Collect: In order to use data to solve a problem, you must gather data to do it! For computer vision, this data consists of pictures and/or videos. This can be as simple as taking pictures or videos on your phone, then uploading them to a service you can use. Roboflow allows you to easily create your own dataset by uploading directly from your computer. (Fun fact that makes computer vision with videos easier: videos are just pictures strung together in a specific order!)
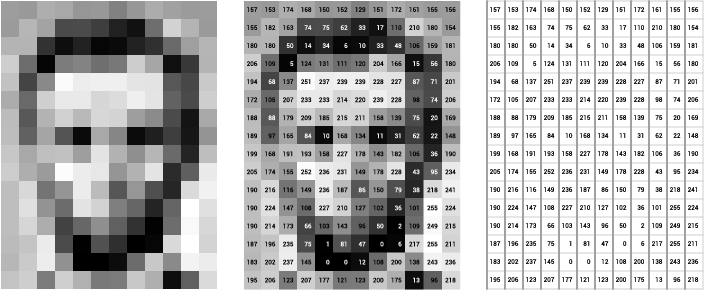
- Label: While the goal is to get computers to see the way we as humans see, computers understand images very differently! Check out this (very pixelated) picture of Abraham Lincoln. On the left, you just see the picture. In the middle, you see the picture with numbers inside each pixel. Each number represents how light or dark a pixel is – the lighter the pixel, the higher the number. The right image is what the computer sees: just the numbers corresponding to each pixel.

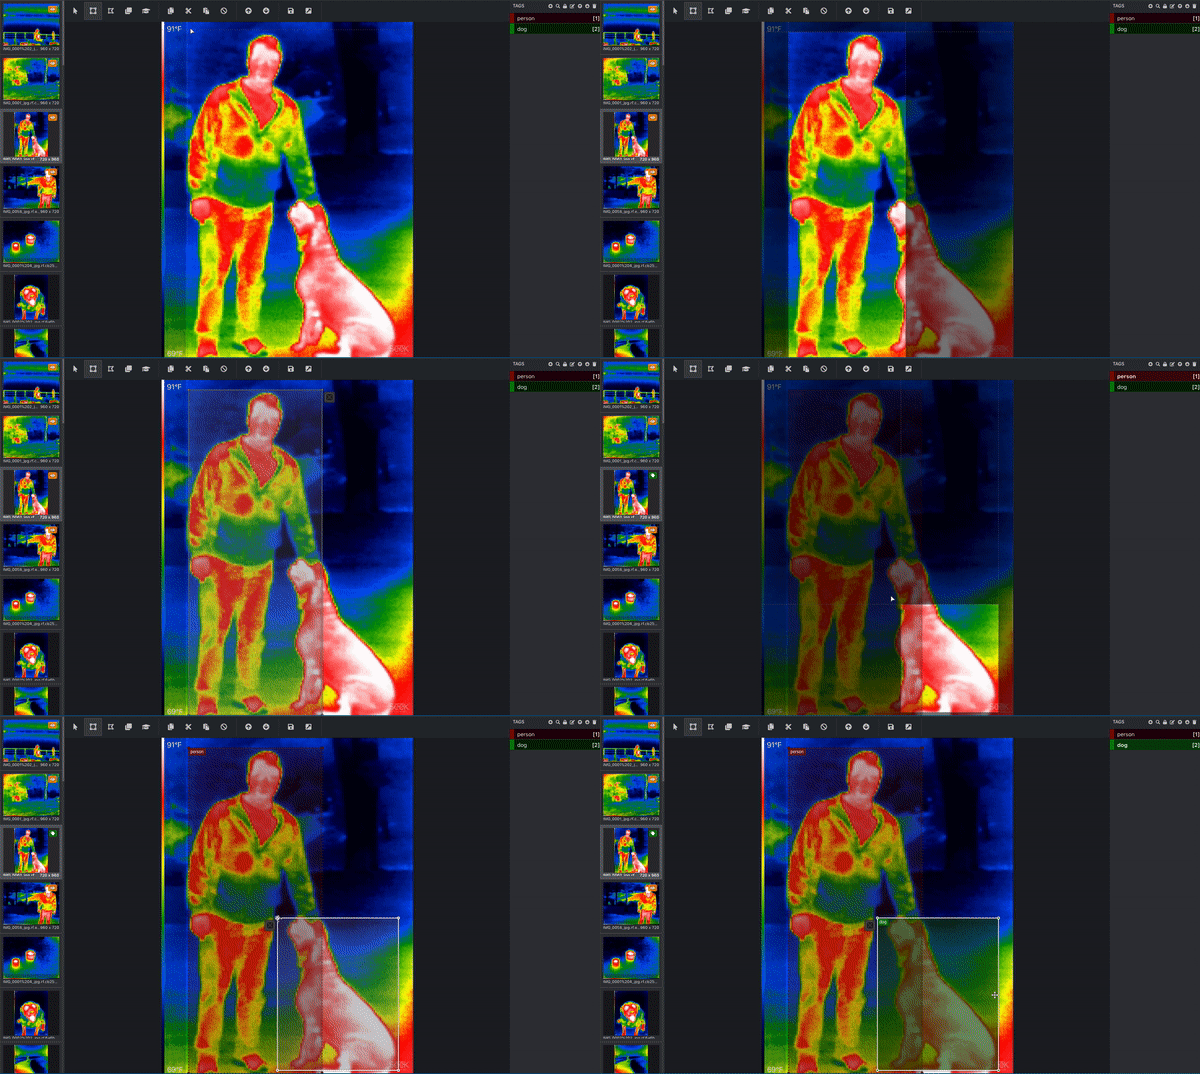
If your goal is to get your computer to understand what dogs look like, then the computer needs you to tell it which pixels correspond to a dog! This is where you label, or annotate, your image. Below is an image from a thermal infrared dataset that is actively being annotated. One bounding box is drawn around the person and a separate bounding box is drawn around the dog. This would be done by a human. (Since this image has more than one object and is using bounding boxes, we know that this image is being used for an object detection task!) These bounding boxes are being added via a tool called Microsoft VoTT, or Visual Object Tagging Tool.

That’s not the only tool – you can use other tools like CVAT (Computer Vision Annotation Tool), Roboflow’s Web App, or our Upload API itself.
Once you’ve gathered the data and chosen your tool for labeling it, you start labeling! You should try to label as many images as you can. If you have more images than you can label, here are some active learning strategies for more efficiently labeling images.
- Organize: Have you worked on a team where multiple people are editing Google Docs – or worse, sending around Microsoft Word files? You and your team might run into similar issues when working with images. Perhaps you’ve asked your team to also gather images. If you have a lot of images – which is great when a model is being built! – it’ll take a lot of time to sort and annotate them. In addition, you probably want to do EDA on your images (exploratory data analysis), like checking for missing values and making sure images were labeled correctly. This step might seem like one you can skip, but it’s a vitally important one!
- Process: Before building the model that teaches your computer “how to see,” there are some steps you can take that will make your model perform even better. Image preprocessing includes steps you take to ensure uniformity in your images. If you have some grayscale images and some red/green/blue color images, you might convert them all to grayscale. If images are of different sizes, most models require all images to be of the same size. Splitting your data into training, validation, and testing sets also falls under the umbrella of image preprocessing.

You can also do something called image augmentation. This is a little bit different – it only affects the images that you use to train your model (teach your computer how to see). In one sentence, image augmentation makes small changes to your images so that your sample size (number of images) increases and so that your images are likelier to reflect real-world conditions. For example, you can randomly change the orientation of your image. Say you take a picture of a truck on your phone. If the computer sees that exact image, it might recognize the truck. If the computer saw a similar image of a truck that was taken with someone’s hand rotated by a couple of degrees, the computer may have a harder time recognizing the truck. Adding augmentation steps boosts your sample size by making copies of original images and then slightly perturbing them so that your model sees other perspectives.
- Train: This is where your computer learns to see! There are many different computer vision models that you can build – including some object detection models and some image classification models. This often requires more expertise in programming and machine learning than we’ll cover today. (At Roboflow, our one-click model train platform is in private beta mode. Get on the one-click model training waiting list!) Earlier, I used the example of you having a stack of 100 images that each contain either one cat or one dog. All “training” means is that our computer basically goes through those images over and over again, learning what it means for an image to have a dog or a cat in it. Hopefully we have enough images and the computer eventually learns enough so that it can see a picture of a dog it’s never seen before, and recognize it as a dog – like my dog, Paddington, below!

There are a lot of different ways in which we can determine how well our computer has learned.
- For image classification problems, your standard classification metrics like accuracy or F1-score should suffice.
- When it comes to object detection, we prefer using mean average precision – and walk through our thought process why!
There are many different models that can be used for image problems, but the most common (and usually best performing!) is the convolutional neural network. If you choose to a convolutional neural network, know that there are a lot of judgment calls that go into the model’s architecture which will affect your computer’s ability to see! Luckily for us, there are lots of pre-specified model architectures that tend to do pretty well for various computer vision problems.
- Deploy: Training the model isn’t quite the end – you probably want to use that model in the real world! In many cases the goal is to quickly generate predictions. In computer vision, we call that inference. (That’s a little different from what inference means in statistics, but we won’t go into that here.)

You might want to deploy your model to an app, so your computer can generate predictions in real time straight from your phone! You might want to deploy to some program on your computer, or to AWS, or to something internal to your team. We’ve already written in detail about one way to deploy a computer vision model here. If you’re at least a little familiar with Python and APIs, this documentation on conducting inference in computer vision might be helpful!
- Display: Want to take it a step further? If you or someone on your team is familiar with augmented reality technology like Google’s ARCore or Apple’s ARKit, then you can take your deployed model to the next level.
Regardless of what your next steps are, the work doesn’t quite finish here! It’s pretty well documented that models that work well on the images you give to it may end up working worse over time. (We read some Google research about this model performance issue and described our takeaways.) However, we hope that you feel like you’ve achieved the goal we wrote at the beginning of this post:
After reading this post, you should have a good understanding of computer vision without a strong technical background and you should know the steps needed to solve a computer vision problem.


