[ad_1]
Jesús Méndez Galvez
3 min read
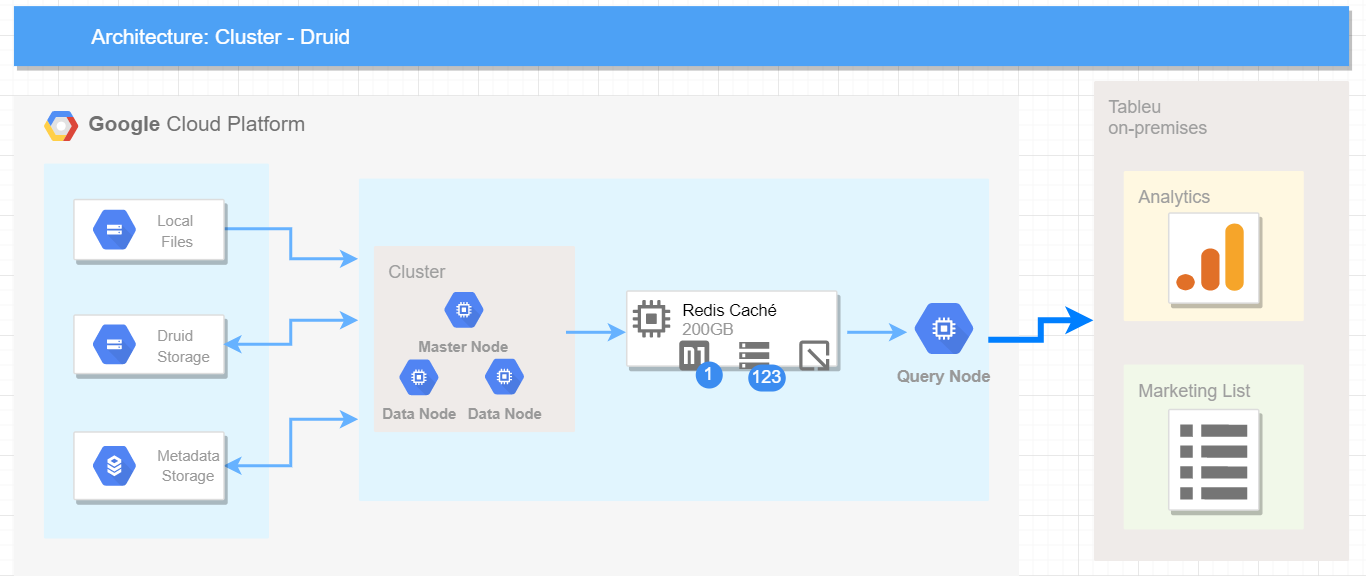
The purpose of this article is to guide through a set up process of an Apache Druid Cluster using GCP
Apache Druid (incubating)
Druid is an open-source analytics data store designed for business intelligence (OLAP) queries on event data. Druid provides low latency (real-time) data ingestion, flexible data exploration, and fast data aggregation.
A Scalable Architecture

Requirements
- For Basic Druid Cluster: 8vCPUS, 30GB RAM and 200GB disk size (E.G. custom-6–30720 or n1-standard-8) per node.
- Have a Google Cloud Storage enable
- Have a MySQL instance or Cloud SQL active
Setting up
Log in with your GCP account and create three virtual machines with SO Debian.
Donwload druid:
run for each node
wget https://www-us.apache.org/dist/incubator/druid/0.15.1-incubating/apache-druid-0.15.1-incubating-bin.tar.gz
tar -xzf apache-druid-0.15.1-incubating-bin.tar.gzexport $PATH_GCP = /path/druid/
Install components
Enter each node with SSH and run:
#Update libraries
sudo apt-get update#Install Java JDK
sudo apt install default-jdk -y #Install Perl
sudo apt-get install perl -y #Donwload MySQL JAR
sudo apt install libmysql-java #Install MySQL server
sudo apt-get install mysql-server -y #Move MySQL JAR to Druid folder
cp /usr/share/java/mysql-connector-java-5.1.42.jar $PATH_GCP/apache-druid-0.15.1-incubating/extensions/mysql-metadata-storage
Install Zookeeper
Zookeeper may be installed in an independent node, although in this case, we are going to install in Master node. Log in using SSH and run the following script.
#Download
wget  tar -zxf zookeeper-3.4.14.tar.gz #create folder and move
sudo mkdir -p /usr/local/zookeeper
sudo mv zookeeper-3.4.14 /usr/local/zookeeper#create folder
sudo mkdir -p /var/lib/zookeeper #create config file
vi /usr/local/zookeeper/conf/zoo.cfg  #add properties inside config file
tickTime=2000
dataDir=/var/lib/zookeeper clientPort=2181
Edit common runtime properties
Edit file located in the route: apache-druid-0.15.1-incubating/conf/druid/cluster/_common/common.runtime.properties, replicate for each node making the suggested changes.
Edit file using sudo vi
sudo vi apache-druid-0.15.1-incubating/conf/druid/cluster/_common/common.runtime.properties
The following changes are written in order.
#Update propertie
druid.extensions.loadList=["druid-google-extensions", "mysql-metadata-storage", "druid-datasketches", "druid-kafka-indexing-service"]

#Update propertie entering local ip for corresponding node where you are editing this file
druid.host=[VM_IP]

#Update propertie entering local ip for corresponding node where Zookeeper is installed (usually Master Node)
druid.zk.service.host=[ZOOKEEPER_IP]

#Comment these codes that are used for storage metadata locally
#druid.metadata.storage.type=derby
#druid.metadata.storage.connector.connectURI=jdbc:derby://localhost:1527/var/druid/metadata.db;create=true
#druid.metadata.storage.connector.host=localhost
#druid.metadata.storage.connector.port=1527

# Edit MySQL properties
druid.metadata.storage.type=mysql
druid.metadata.storage.connector.host=[MYSQL_IP] or [CLOUDSQL_IP]
druid.metadata.storage.connector.connectURI=jdbc:mysql://[MYSQL_IP]:3306/[MYSQL_DB]
druid.metadata.storage.connector.user=[MYSQL_USER]
druid.metadata.storage.connector.password=[MYSQL_PSW]

# Comment these properties
#druid.storage.type=local
#druid.storage.storageDirectory=var/druid/segments

#Deep Storage
#We are using GCS (Creating ´segments´ folder is not needed)
druid.storage.type=google
druid.google.bucket=[BUCKET_NAME]
druid.google.prefix=[BUCKET_PATH]/segments

# Indexing service logs
#We are using GCS (Creating ´indexing-logs´ folder is not needed)
druid.indexer.logs.type=google
druid.indexer.logs.bucket=[BUCKET_NAME]
druid.indexer.logs.prefix=[BUCKET_PATH]/indexing-logs
Enabling basic security
If you need to set up a basic authentication system, add these properties in the common file for each node. After doing this you’ll have a admin user with the password [PASSWORD_1]with access to all segments in the cluster.
add the following properties inside the file: apache-druid-0.15.1-incubating/conf/druid/cluster/_common/common.runtime.properties
#UPDATE propertie
druid.extensions.loadList=["druid-google-extensions", "mysql-metadata-storage", "druid-datasketches", "druid-kafka-indexing-service", "druid-basic-security"]

#ADD EVERYTHING BELLOW
#Druid authorization

#Add to common properties
druid.auth.basic.common.pollingPeriod=60000
druid.auth.basic.common.maxRandomDelay=6000
druid.auth.basic.common.maxSyncRetries=10
druid.auth.basic.common.cacheDirectory=null

#Creating authenticator
druid.auth.authenticatorChain=["[NAME]Authenticator"]

druid.auth.authenticator.[NAME]Authenticator.type=basic
druid.auth.authenticator.[NAME]Authenticator.initialAdminPassword=[PASSWORD_1]
druid.auth.authenticator.[NAME]Authenticator.initialInternalClientPassword=[PASSWORD_2]
druid.auth.authenticator.[NAME]Authenticator.authorizerName=[NAME]Authorizer

druid.auth.authenticator.[NAME]Authenticator.enableCacheNotifications=true
druid.auth.authenticator.[NAME]Authenticator.cacheNotificationTimeout=5000
druid.auth.authenticator.[NAME]Authenticator.credentialIterations=10000

#Escalator
druid.escalator.type=basic
druid.escalator.internalClientUsername=druid_system
druid.escalator.internalClientPassword=[PASSWORD_2]
druid.escalator.authorizerName=[NAME]Authorizer

#Creating Authorizer chequear
druid.auth.authorizers=["[NAME]Authorizer"]
druid.auth.authorizer.[NAME]Authorizer.type=basic
druid.auth.authorizer.[NAME]Authorizer.enableCacheNotifications=true
druid.auth.authorizer.[NAME]Authorizer.cacheNotificationTimeout=5000
Running Apache Druid
Start Zookeeper
Run in the node where you downloaded
sudo /usr/local/zookeeper/bin/zkServer.sh start
Start Master
export PATH_GCP=[PATH_GCP]
sudo nohup $PATH_GCP/apache-druid-0.15.1-incubating/bin/start-cluster-master-no-zk-server &#See log
tail -f $PATH_GCP/apache-druid-0.15.1-incubating/var/sv/coordinator-overlord.log
Start Data Server
export PATH_GCP=[PATH_GCP]
sudo $PATH_GCP/apache-druid-0.15.1-incubating/bin/start-cluster-data-servertail -f $PATH_GCP/apache-druid-0.15.1-incubating/var/sv/historical.log
Start Query Server
export PATH_GCP=[PATH_GCP]
sudo $PATH_GCP/apache-druid-0.15.1-incubating/bin/start-cluster-query-servertail -f $PATH_GCP/apache-druid-0.15.1-incubating/var/sv/broker.log
Access Druid UI
Before accessing for your local machine you need to open ports: 8888, 8081, 8082 and 8083 as a shortcut you can run this code in the project cloud shell.
export LOCAL_IP=[LOCAL_IP]
gcloud compute --project=$PROJECT_ID firewall-rules create druid-port --direction=INGRESS --priority=1000 --network=default --action=ALLOW --rules=all --source-ranges=$LOCAL_IP
Now, you could work with druid.
[ad_2]
This article has been published from the source link without modifications to the text. Only the headline has been changed.
Source link


