The best way to learn is by doing, teaching, and demonstrating. I solidified my knowledge of blockchains and programming by building one in Python.
Follow along with me as I code a blockchain for the first time, teach you what I learned, and learn about myself along the way!
If you’re not sure how a blockchain works, check out my article on Blockchain for Beginners to set you up for the content covered in this tutorial.
The process of choosing what kind of language and what interpreter to use for building a blockchain was by far the hardest part of this endeavor. I had minimal experience in Python and wanted to stay within my comfort zone. In the end, I realized that nobody ever accomplished anything sticking within their limits, and I decided to go head on and start coding in Python. Python is great because it’s simple for beginners and effective for high-level coding simultaneously.
Setup
I downloaded Python 3.9, opened it, tried to print my name, and promptly shut my laptop and walked out of the room. Oh, dear. I was missing an IDE (Integrated Code Editor), and wouldn’t be able to execute any code with just plain Python. Some research and a couple hours later and I was back to the laptop. This time, I played around with some interpreters until I picked one I liked the best. It’s PyCharm. PyCharm ranks most popular amongst Python users for good reason. Its interface is simple and suitable for all levels. I experimented with writing simple commands until I was comfortable with PyCharm. Now, time to build a Blockchain.
I referenced this video on YouTube and this GitHub source code.
I would highly recommend following along with a video or article tutorial if it’s your first time coding. It helped me grasp what I was writing and why I was writing it.
To start out, I imported hashlib and datetime, to let us calculate hashes and timestamp blocks, respectively.

Imports are modifications that transfer code from one module to another. My blockchain wouldn’t be able to process the timestamp without the datetime import, or create hashes without the hashlib import.
The blockchain contains two classes: a Block class and a Blockchain class. Every block that is added to the blockchain is modeled the same, using the Block class.
Block class
The block must include the following attributes:
- the number of the block, which is set to 0 because it is the first block in the chain, known as the Genesis Block
- data, set to none
- next, set to none. This acts as a pointer to the next block, which continues the trend of linking.
- hash, set to none. The hash of the block is critical because it is a part of the cryptography that makes blockchains so secure and immutable.
- nonce, set to 0. A nonce is a random whole number iterated over and over again until the “Golden Nonce” is found. In proof of work, miners compete to find the right hash first. The nonce changes many times until it helps generate the right hash. This completes the verification of the block and the block may be added to the chain.
- previous hash, set to 0x0. Storing the hash of the previous block renders the blockchain immutable, since changing the hash of a block would affect all subsequent blocks.
- time, or timestamp, describing the time that a transaction took place and used to synchronise all the blocks in the network.
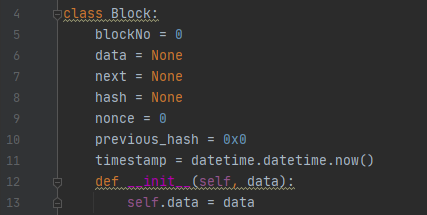
When we create a block we store its data. The constructor function init initializes the attributes of the class. Self and data represent what will be contained within an object, the block.
Hashes
The next step is to add the hash function, which calculates the hash of the block.
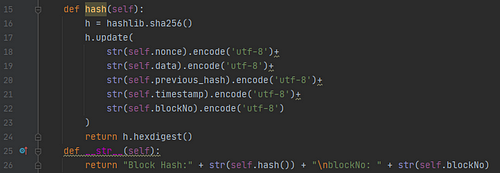
The nonce, the data, the previous hash, the timestamp, and the block number are put into a string and run through the SHA-256 function. SHA-256 is a cryptographic hashing algorithm commonly used for blockchains. “h” is the variable that uses SHA-256. Because I imported hashlib at the beginning of the code, SHA-256 is available. The totality of the components within the hash function will create the block’s hash, which is added in the hash field when a new block is created.
The last line in the picture tells describes what will be shown in the output, or what is printed. In this case, the output will display the block’s hash and the block number.
Blockchain class
The next step is to create the second class of the code: the Blockchain class. The blockchain class consists of:
- difficulty, set to 20. By increasing the difficulty, we effectively decrease the target range. Decreasing the target range makes it harder to mine a block, which is useful when dealing with a network that has many nodes working to find the acceptable hash.
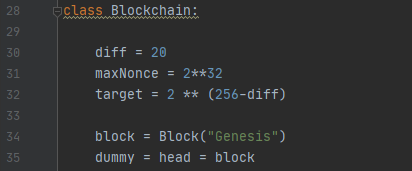
- maximum nonce, set to 2 to the power of 32, which is the maximum number that can be stored in a 32-bit number. The nonce must be less than the target number to be accepted.
- target number, set to 2 to the power of 256 minus the difficulty. In this case, the difficulty is 20.
The very first block in a blockchain is the Genesis block, as shown in line 34. Now, I got quite stuck on the next line of code: dummy = head = block. The start of any linked list is called the head. Since the head of our linked list is the Genesis block, we write that down in code as head = block. However, this alone is not specific enough — in Python, objects are passed by reference. Head and block would then point to the same thing. A random variable must be written before the head variable (in this case, dummy), to tell the computer that head does not point to the same object as block.
Adding blocks
We will continue the idea that a blockchain is a linked list for the add function, used to add blocks to the chain.

Blockchain takes its shape as a linked list with the help of hashes. Hashes tie blocks together, making it immutable. The previous hash (line 39) must be set equal to the block currently at the top of the list. Then, the new block is set equal to the current block plus one, as seen in the third line of code.
The last two lines help form the shape of the blockchain. As shown in “self.block.next = block”, every block has a pointer to the next block, hence the next pointer is set to block. This adds the block to the end of the list. The next line, “self.block = self.block.next”, moves the pointer forward to continue the trend of adding blocks to the end of the list.
Mining
Next I added a mining function. I used a proof of work consensus mechanism, like Bitcoin. In order for blocks to added to the chain, the nodes try out different nonces until it finds a hash less than the target range.
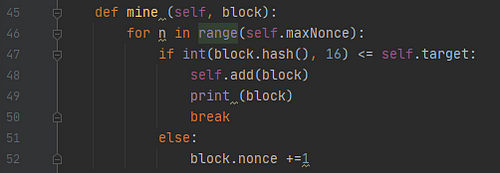
Line 46 starts a loop. It begins by setting some guessing guidelines (the range), which are 0 to the maximum nonce. It continues on line 47 by checking if the current block’s hash is less than or equal to the target. The hash must be converted to an integer in Python, hence int. The process continues if the hash is below the target, and the block may be added (line 48). Next, the block is printed, and finally, we stop mining with a break. However, if the hash is NOT less than the target number, we add 1 to the nonce and try again.
Finishing up
We end our code with a loop that begins on line 56. It calculates 10 random blocks. You can play around with the numbers, but it will always stop at exactly whatever integer you plug into it.
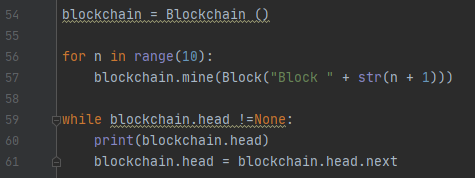
Line 60 prompts the printing of the 10 blocks. I love pressing run on the code and seeing it in action. Once you finish this line, you’re officially DONE! Run it a couple times to check for errors and admire your handiwork. In only 61 lines, you created a blockchain that can generate blocks, calculate hashes, and put it all together!
This was my first-ever attempt at coding a blockchain and using Pycharm! The hardest part in general was understanding WHY I was writing something, rather than just copying it down and calling it a day. I spent a great deal of time hunched over my laptop trying to figure out what various Python terms meant and how to explain them in a way that others could understand, too. This project was definitely a solid foundation to build on. I tasted a little bit of everything and gained a deeper understanding of blockchain architecture.
Check out the source code and play around with it in your own terminal! As they say, doing is one of the best ways to learn (and I can vouch for that).


