[ad_1]
Two weeks ago we were asked to deliver a workshop with one of my colleagues on machine learning and bots. We had the idea to train a neural network in the first part of the workshop and make use of this in the bot demoed in the second part — digit recognition using the MNIST dataset is a very famous ‘hello-world level’ machine learning problem, so that’s what we’ve chosen.
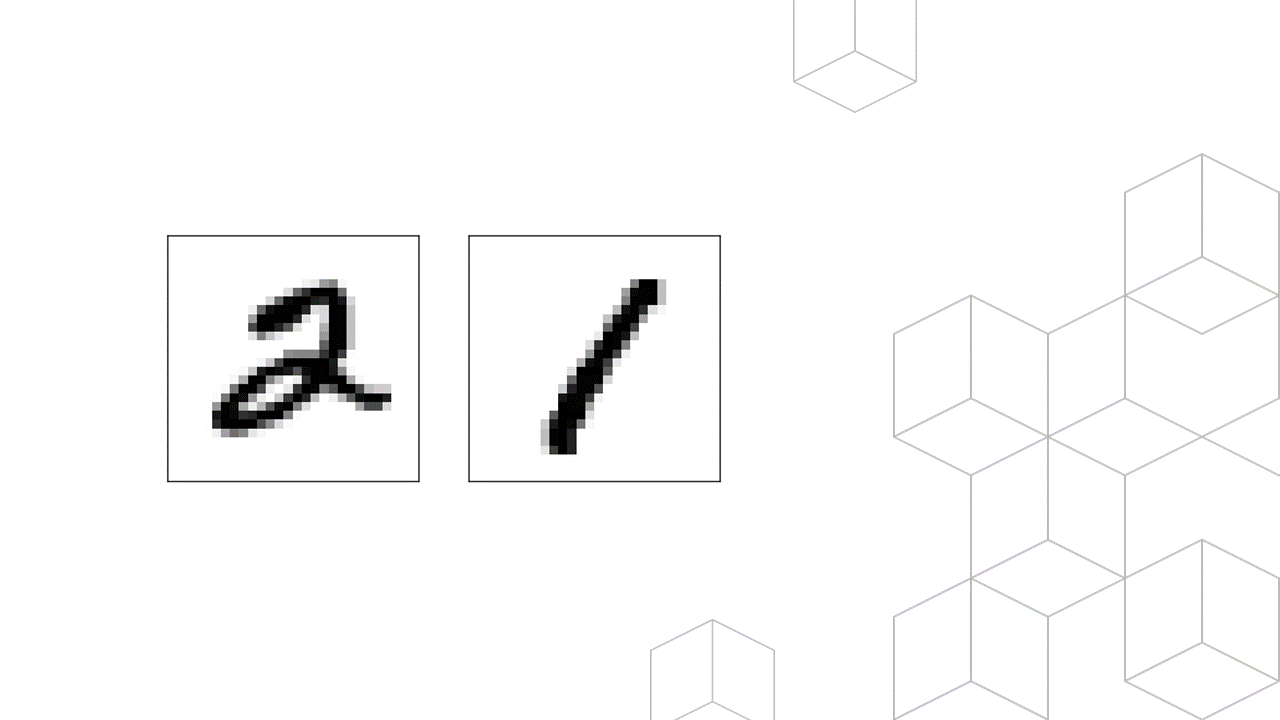
The only thing I wasn’t giving attention is that the MNIST dataset contains 28 by 28 pixel images with absolute white backgrounds and black digits centered into a 20 by 20 pixel square. Which is not quite like the images you’ll shoot with your phone and send to the bot…

So the accuracy of the neural network with 1080p camera images was around 10% (no better than random). The accuracy with MNIST test images are about 98%. We clearly needed some preprocessing.
The chat bot I was writing is based on Microsoft Bot Framework (which is a pretty cool open-source framework btw) so I was thinking about preprocessing the images in ASP.NET Core. Luckily there’s a great nuget package called ImageSharp.
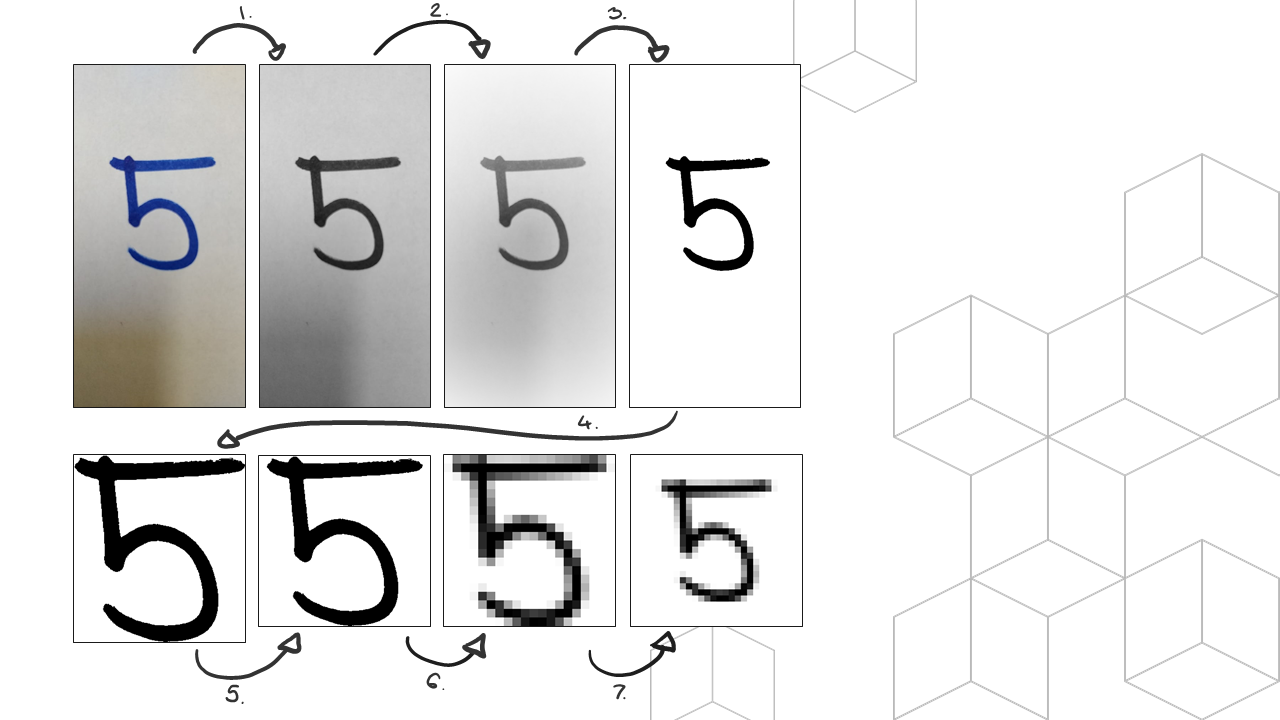
Let’s have a look on the steps we need to take:

First, we’ll need to apply a grayscale filter on the original source image. This will basically sum the R, G and B part of each pixel and divide them with 3.
Second, we’ll remove the shadow marks (as you can see on the above image) with a vignette. This is a standard filter part of every photo app — applies a radial glow to the image making the corners darker — now with white color.
Third, separating foreground from the background. In this case the single digit from everything else. This is done by a binary threshold: everything above a given threshold will be pitch black, and everything below that absolutely white.
The next step is a little bit more complex. We need to crop the image dynamically to the content — for this, we need to find the bounding box first. Briefly, it will iterate from each side of the image and find the last row/column where there’s no pixel which is different then the background color (in this case white). You can check out the code here, if you are interested.
Fifth, we’ll have to make the image a square (add some padding to each side which is less than the maximum of the image width and height).
Lastly, to center the image we’ll first downscale the image to 20 by 20 pixel and add 4 pixel margin. This will produce a perfectly centered 28 by 28 pixel white background, black foreground image which is just what our neural network needs.
/// <summary>
/// Preprocess camera images for MNIST-based neural networks.
/// </summary>
/// <param name="image">Source image in a file format agnostic structure in memory as a series of Rgba32 pixels.</param>
/// <returns>Preprocessed image in a file format agnostic structure in memory as a series of Rgba32 pixels.</returns>
public static Image<Rgba32> Preprocess(Image<Rgba32> image)
{
    // Step 1: Apply a grayscale filter
    image.Mutate(i => i.Grayscale());

    // Step 2: Apply a white vignette on the corners to remove shadow marks
    image.Mutate(i => i.Vignette(Rgba32.White));

    // Step 3: Separate foreground and background with a threshold and set the correct colors
    image.Mutate(i => i.BinaryThreshold(0.6f, Rgba32.White, Rgba32.Black));

    // Step 4: Crop to bounding box
    var boundingBox = FindBoundingBox(image);
    image.Mutate(i => i.Crop(boundingBox));

    // Step 5: Make the image a square
    var maxWidthHeight = Math.Max(image.Width, image.Height);
    image.Mutate(i => i.Pad(maxWidthHeight, maxWidthHeight).BackgroundColor(_backgroundColor));

    // Step 6: Downscale to 20x20
    image.Mutate(i => i.Resize(20, 20));

    // Step 7: Add 4 pixel margin
    image.Mutate(i => i.Pad(28, 28).BackgroundColor(_backgroundColor));

    return image;
}
The accuracy of our solution increased from 10% to the accuracy of the neural net (98%).
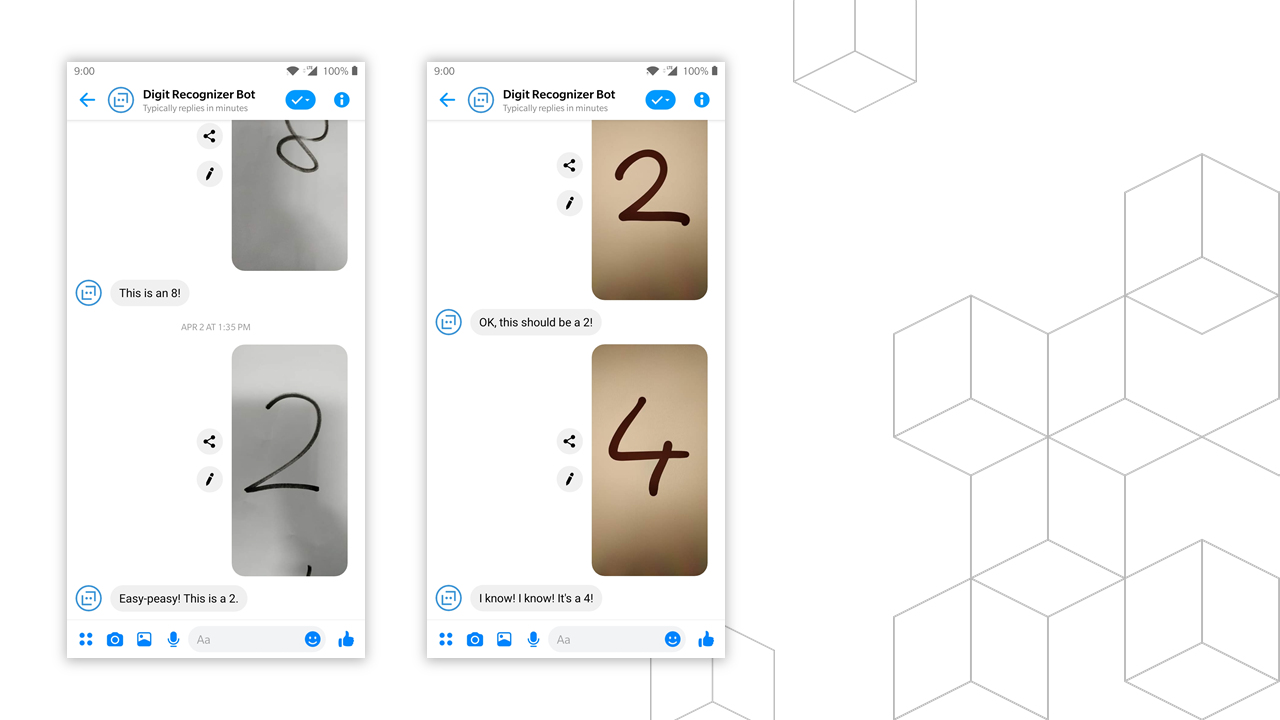
You can try out the working Digit Recognizer Bot on Messenger and check out the full code below:
using SixLabors.ImageSharp;
using SixLabors.ImageSharp.PixelFormats;
using SixLabors.ImageSharp.Processing;
using SixLabors.Primitives;
using System;
using System.IO;

namespace ImagePreprocessingService
{
    public class MNISTPreprocessor
    {
        private static readonly Rgba32 _backgroundColor = Rgba32.White;
        private static readonly Rgba32 _foregroundColor = Rgba32.Black;

        /// <summary>
        /// Preprocess camera images for MNIST-based neural networks.
        /// </summary>
        /// <param name="image">Source image in a byte array.</param>
        /// <returns>Preprocessed image in a byte array.</returns>
        public static byte[] Preprocess(byte[] input)
        {
            Image<Rgba32> image = Image.Load(input);

            image = Preprocess(image);

            var stream = new MemoryStream();
            image.SaveAsPng(stream);

            return stream.ToArray();
        }

        /// <summary>
        /// Preprocess camera images for MNIST-based neural networks.
        /// </summary>
        /// <param name="image">Source image in a file format agnostic structure in memory as a series of Rgba32 pixels.</param>
        /// <returns>Preprocessed image in a file format agnostic structure in memory as a series of Rgba32 pixels.</returns>
        public static Image<Rgba32> Preprocess(Image<Rgba32> image)
        {
            // Step 1: Apply a grayscale filter
            image.Mutate(i => i.Grayscale());

            // Step 2: Apply a white vignette on the corners to remove shadow marks
            image.Mutate(i => i.Vignette(Rgba32.White));

            // Step 3: Separate foreground and background with a threshold and set the correct colors
            image.Mutate(i => i.BinaryThreshold(0.6f, _backgroundColor, _foregroundColor));

            // Step 4: Crop to bounding box
            var boundingBox = FindBoundingBox(image);
            image.Mutate(i => i.Crop(boundingBox));

            // Step 5: Make the image a square
            var maxWidthHeight = Math.Max(image.Width, image.Height);
            image.Mutate(i => i.Pad(maxWidthHeight, maxWidthHeight).BackgroundColor(_backgroundColor));

            // Step 6: Downscale to 20x20
            image.Mutate(i => i.Resize(20, 20));

            // Step 7: Add 4 pixel margin
            image.Mutate(i => i.Pad(28, 28).BackgroundColor(_backgroundColor));

            return image;
        }

        private static Rectangle FindBoundingBox(Image<Rgba32> image)
        {
            // ➡
            var topLeftX = F(0, 0, x => x < image.Width, y => y < image.Height, true, 1);

            // ⬇
            var topLeftY = F(0, 0, y => y < image.Height, x => x < image.Width, false, 1);

            // ⬅
            var bottomRightX = F(image.Width - 1, image.Height - 1, x => x >= 0, y => y >= 0, true, -1);

            // ⬆
            var bottomRightY = F(image.Height - 1, image.Width - 1, y => y >= 0, x => x >= 0, false, -1);

            return new Rectangle(topLeftX, topLeftY, bottomRightX - topLeftX, bottomRightY - topLeftY);

            int F(int coordinateI, int coordinateJ, Func<int, bool> comparerI, Func<int, bool> comparerJ, bool horizontal, int increment)
            {
                var limit = 0;
                for (int i = coordinateI; comparerI(i); i += increment)
                {
                    bool foundForegroundPixel = false;
                    for (int j = coordinateJ; comparerJ(j); j += increment)
                    {
                        var pixel = horizontal ? image[i, j] : image[j, i];
                        if (pixel != _backgroundColor)
                        {
                            foundForegroundPixel = true;
                            break;
                        }
                    }

                    if (foundForegroundPixel) break;
                    limit = i;
                }

                return limit;
            }
        }

        public static int[] ConvertImageToArray(Image<Rgba32> image)
        {
            var pixels = new int[784];
            var i = 0;
            for (int j = 0; j < image.Height; j++)
            {
                for (int k = 0; k < image.Width; k++)
                {
                    pixels[i] = 255 - ((image[k, j].R + image[k, j].G + image[k, j].B) / 3);
                    i++;
                }
            }

            return pixels;
        }

        private void PrintToConsole(Image<Rgba32> image)
        {
            var pixels = ConvertImageToArray(image);
            for (int i = 0; i < 784; i++)
            {
                Console.Write(pixels[i].ToString("D3"));
                if ((i + 1) % 28 == 0) Console.WriteLine();
            }
        }
    }
}

I’m a Partner Technology Strategist at Microsoft, helping partners grow and reach the global market — from the technical side. A true geek, from time to time showing up at conferences and events around Central and Eastern Europe talking about some future stuff, probably with a HoloLens on my head. [)-)
[ad_2]
This article has been published from the source link without modifications to the text. Only the deadline has been changed.


