[ad_1]
Where are the real world use cases?
One of the biggest criticisms of blockchain technology today is that there are no actual use cases of the blockchain. Sure, Bitcoin is being widely used as a tradeable digital asset, but its mention in the media is often accompanied by statements like, “Bitcoin is only scratching the surface of what the underlying technology can do.”
This media message has been around for a few years, however, it’s rather surprising that serious blockchain based applications still haven’t been built or adopted at any appreciable level. Cryptokitties might be the only exception here, but even its popularity is fleeting. Sure, people talk about all the things the blockchain can do for supply chain management, social media, healthcare, gaming and more, but what’s actually been built? Not much.
So what can blockchain be used for besides digital currencies? In this post, we’re going to take a look at a simple, practical, non-currency based use of the blockchain. Then we’ll show you how to build it!
The Twitter use case
Twitter has been an amazing tool that has effectively cut out the middle man (i.e. the mainstream media and publication outlets) for celebrities and political figures to converse directly with the general populace. In the pre-Twitter days, if an entertainment star wanted to send a message to all her fans, she needed to either write a press release or send an email to a mailing list. Twitter-enabled mass, real-time interaction has largely reconfigured thought dissemination globally.
However, all of this infrastructure is maintained by a central entity: Twitter. No matter how noble its efforts, the company can, at any time modify someone’s old tweets, delete tweets, censor political figures, de-platform dissenters of causes they support or revoke a user’s access altogether. Not only that, users themselves can delete Tweets they made that implicate them in illegal activity or put them in a less than flattering light.
These scenarios are not hypothetical. They are happening at an alarming rate. Alex Jones, a highly controversial conspiracy theorist, who had a massive Twitter following recently had his account deleted by Twitter altogether. Cody Garbrandt, a well-known UFC fighter, had to face the court of public opinion when old Tweets he made resurfaced, where at best he appeared racially insensitive. And Donald Trump…ok, let’s not get into that.

Whether or not you agree with the morality of these decisions and events, the fact of the matter is that all users and consumers of Twitter are beholden to the decisions a central authority makes and the privileges it grants its users. If Twitter wants to delete a Tweet they can. If they want to delete a user’s entire record, they can. If a user wants to delete his own Tweets, he can.
What if we had a decentralized platform where anyone who wanted could efficiently aggregate Tweets from various users’ accounts, have them cross verified by the network and posted in a distributed ledger? This way, if Twitter ever went out of business, or people were suspecting Twitter was deleting or modifying Tweets, users could reference the distributed ledger to see what the “true” data was. The reason we want to put this on a blockchain, or a distributed ledger, is because if we created a centralized database to store it, we’re no better than Twitter. If our database goes down, the rest of the network suffers as well. We want lots of people to have copies of this data.
Turns out this is not difficult to implement. We’re going to create a basic version of this now. Let’s get started!
Setup
We’re going to be writing our program in Go so be sure to install it and get it working on your machine.
Our first blockchain tutorial is a pre-requisite. Make sure to go through it if you haven’t already.
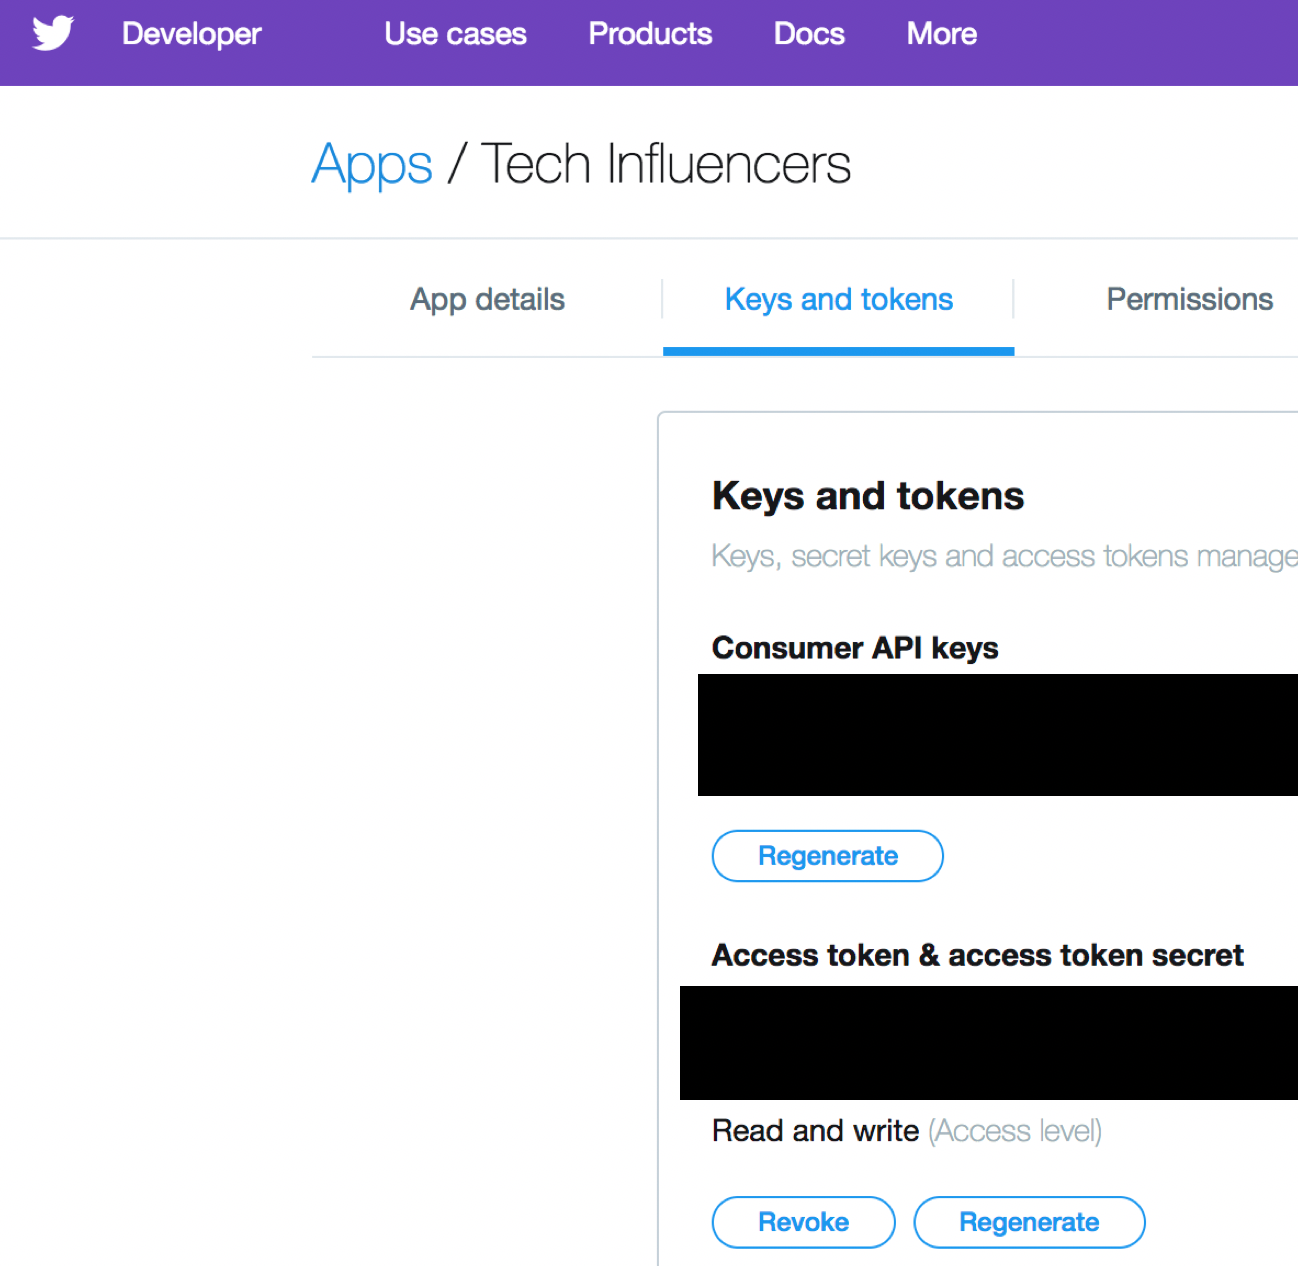
Set up a developer account on Twitter. You will need an API Key, an API Secret, a Token and a Token Secret as seen on this page:

The perceptive reader will ask, “wait a second, if we’re building an application that is supposed to be independent of Twitter, why are we using their API”? The answer is, “because it’s much simpler to demonstrate for this tutorial”. If you want to build or use your own Twitter web scraper, go ahead. There are many scraping libraries available.
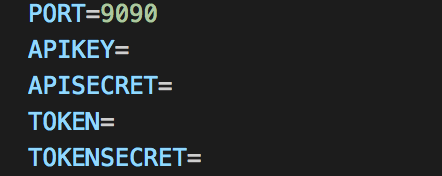
Create a clean working directory and navigate to it. Create a .env file in your working directory with the following variables. Pick an HTTP port (we’re using 9090) and fill in the rest with the API credentials you got from Twitter.

Create a main.go file.
Grab the following packages. We’ll explain what these do in the next section.
go get github.com/gorilla/muxgo get github.com/dghubble/oauth1go get github.com/joho/godotenv
Tweet Parsing
We’ll be writing everything in our main.go file. We need to write a program that can quickly pull a large volume of the latest tweets by Twitter handle. We then want to clean it up a bit by getting rid of retweets, @ mentions and posted links. We just want to get at the unique content they wrote.
Make our main package declaration. Also, here are the imports we’ll need:
package main

import (
	"encoding/json"
	"fmt"
	"io/ioutil"
	"log"
	"net/http"
	"os"
	"regexp"
	"strings"
	"time"

	"github.com/dghubble/oauth1"
	"github.com/gorilla/mux"
	"github.com/joho/godotenv"
)
Let’s set our global struct, variables and constants.
// Tweet is a collection of important info in each Tweet
type Tweet struct {
	Date string `json:"created_at"`
	Text string `json:"text"`
	ID   string `json:"id_str"`
}

var config *oauth1.Config
var token *oauth1.Token

// API page limit
const pages = 18
Tweetallows us to consume results returned by the Twitter APIconfigandtokenare structs we get back from theoauth1package we imported. This is a convenience package that easily allows us to make client calls to the Twitter API.pagesis set to 18, which is currently the maximum number of pages returned by the Twitter API, which translates to 3000 of a Twitter handle’s latest Tweets
We’ll now write up a couple quick helper functions we’ll need.
// makeMuxRouter defines and creates routes
func makeMuxRouter() http.Handler {
	muxRouter := mux.NewRouter()
	muxRouter.HandleFunc("/{id}", handleGetTweets).Methods("GET")
	return muxRouter
}

func respondWithError(err error, w http.ResponseWriter) {
	log.Println(err)
	w.WriteHeader(500)
	w.Write([]byte(err.Error()))
}
maxeMuxRoutercreates the handlers we’ll want to pass in a Twitter and handle and get back their Tweets. We’ll be viewing the results in a browser so want to spin up a local server.respondWithErrorwrites a500header and returns the error message in the browser if we encounter any failures in our code
Now comes the meat of the code. We’ll show the next function we need handleGetTweets and go through it.
func handleGetTweets(w http.ResponseWriter, r *http.Request) {
	var maxIDQuery string
	var tweets []Tweet
	vars := mux.Vars(r)
	userID := vars["id"]

	// httpClient will automatically authorize http.Requests
	httpClient := config.Client(oauth1.NoContext, token)

Outer:
	for i := 0; i < pages; i++ {
		// Twitter API request
		// userID is the Twitter handle
		// maxIDQuery is the last result on each page, so the API knows what the next page is
		path := fmt.Sprintf("https://api.twitter.com/1.1/statuses/user_timeline.json?screen_name=%v&include_rts=false&count=200%v", userID, maxIDQuery)
		if strings.Contains(path, "favicon.ico") { // API returns this so skip it, not needed
			break
		}

		resp, err := httpClient.Get(path)
		if err != nil {
			respondWithError(err, w)
			break
		}

		defer resp.Body.Close()
		body, err := ioutil.ReadAll(resp.Body)
		if err != nil {
			respondWithError(err, w)
			break
		}

		var gotTweets []Tweet
		err = json.Unmarshal(body, &gotTweets)
		if err != nil {
			respondWithError(err, w)
			break
		}

		// range through Tweets to clear out unneeded info
		for i, t := range gotTweets {

			if i == len(gotTweets)-1 {
				// this is the logic to tell Twitter API where the pages are
				if maxIDQuery == fmt.Sprintf("&max_id=%v", t.ID) {
					break Outer
				}
				maxIDQuery = fmt.Sprintf("&max_id=%v", t.ID)
			}

			// remove @ mentions and links from returned Tweets
			regAt := regexp.MustCompile(`@(\S+)`)
			t.Text = regAt.ReplaceAllString(t.Text, "")
			regHTTP := regexp.MustCompile(`http(\S+)`)
			t.Text = regHTTP.ReplaceAllString(t.Text, "")
			tweets = append(tweets, t)
		}
	}

	var result []string

	for _, t := range tweets {
		result = append(result, t.Text)
	}

	stringResult := strings.Join(result, "\n")

	w.WriteHeader(200)
	w.Write([]byte(stringResult))
}
This is a handler that returns Tweets based on a user’s Twitter account name. The first set of variables do the following:
maxIDQueryis the last Tweet ID of a page of results returned by the Twitter API. We’ll need it to tell Twitter that we want the next page of results, which starts after this ID.tweetsis a placeholder slice to consume a list of Tweets- the next couple lines of code allow us to parse in the Twitter handle from the URL we’ll use to make a GET request to our program, which will contain the Twitter handle of the user we want
http.Clientis a new client based on the developer keys we got
We then proceed to make iterative calls to the Twitter API. The URL format https://api.twitter.com/1.1/statuses/user_timeline.json?screen_name=%v&include_rts=false&count=200%v includes the user’s Twitter handle, skips retweets with rts=false and puts 200 Tweets in a page, which is the maximum allowed.
The API likes to return a weird favicon.ico object so we’ll skip that.
The next lines of code make the HTTP call to the API, read the returned JSON body, and unmarshal it into an empty gotTweets slice.
Now we need to range through the gotTweets slice and process them so we clear out parts of Tweets we don’t need.
- First, if we hit the last Tweet on the page, we want to skip further processing and tell our program where we left off with
maxQueryID - We use some regular expressions to filter out @ mentions and links in users’ Tweets. This is optional. If you want to keep them, go ahead.
Then we concatenate the cleaned up Tweets and return the results in our browser with a 200 success response.
Let’s finish off by creating our main function.
func main() {
	err := godotenv.Load()
	if err != nil {
		log.Fatal(err)
	}

	// Load API credentials
	config = oauth1.NewConfig(os.Getenv("APIKEY"), os.Getenv("APISECRET"))
	token = oauth1.NewToken(os.Getenv("TOKEN"), os.Getenv("TOKENSECRET"))

	s := &http.Server{
		Addr:           os.Getenv("PORT"),
		Handler:        makeMuxRouter(),
		ReadTimeout:    20 * time.Second,
		WriteTimeout:   120 * time.Second,
		MaxHeaderBytes: 1 << 20,
	}

	if err := s.ListenAndServe(); err != nil {
		log.Fatal(err)
	}
}
- We load our environment variables listed in our
.envfile into our program with thegodotenvpackage - Similarly, we load our
configandtokenvariables using the developer keys we got from Twitter - We then create and start our server, and we’re done!
Here is the full code on Github: https://github.com/mycoralhealth/twitter-blockchain/blob/master/main.go
Test Run
Run your code with go run main.go
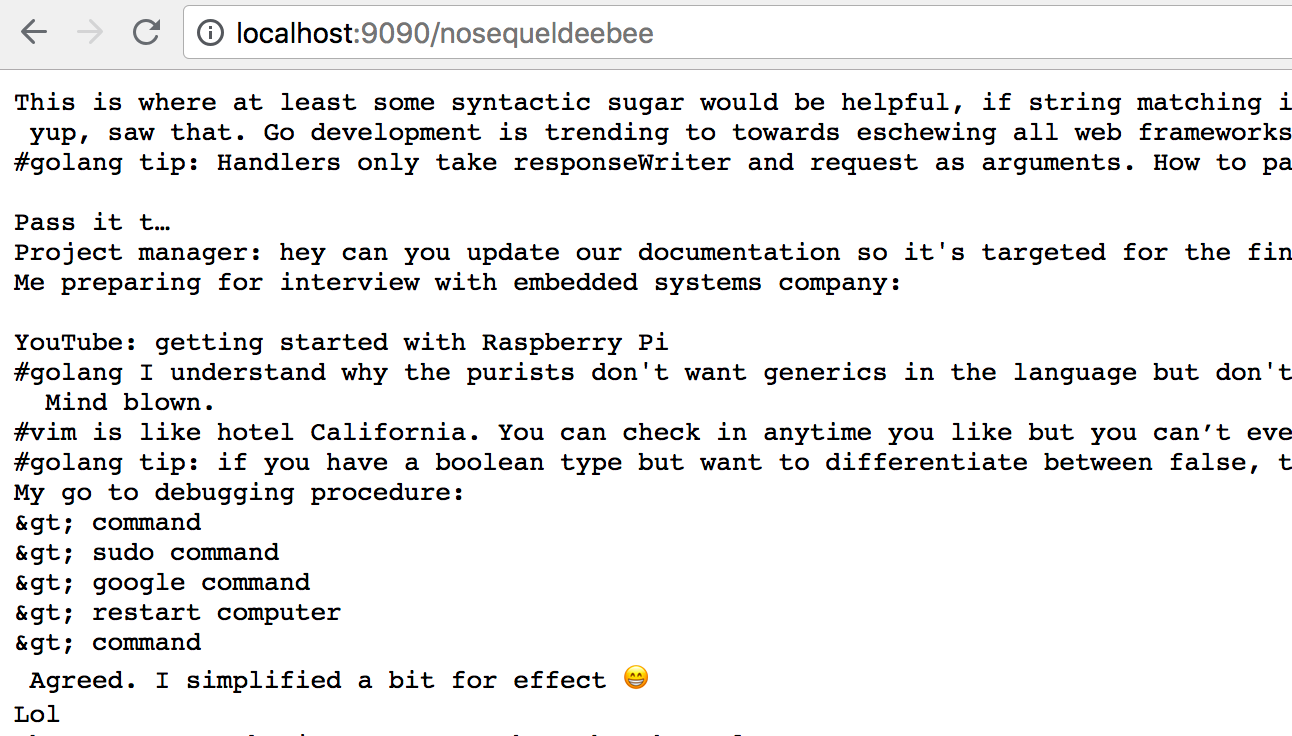
Let’s fire up a browser, visit localhost and the port we used in our .env file. After the forward slash, pick a Twitter handle. We’ll use nosequeldeebee, the author of this tutorial.

Nice! This is a cleaned up list of user created Tweets (non retweets), all in one place!
Now that we’ve successfully aggregated and filtered for unique content by Twitter user, we want to put a record of this on the blockchain. But we don’t want to put all this information directly on the blockchain. It’s a lot of text and the blockchain is terrible at storing large volumes of data. What do we do? This is where hashing comes into play.
Hashing
We can take this entire body of text we just got in the previous section and represent it in a short, SHA256 string. You should have become familiar with SHA256 hashing in the blockchain tutorial you read as a prerequisite to this tutorial. This short string is much nicer to store on the blockchain than a big blob of ASCII text.
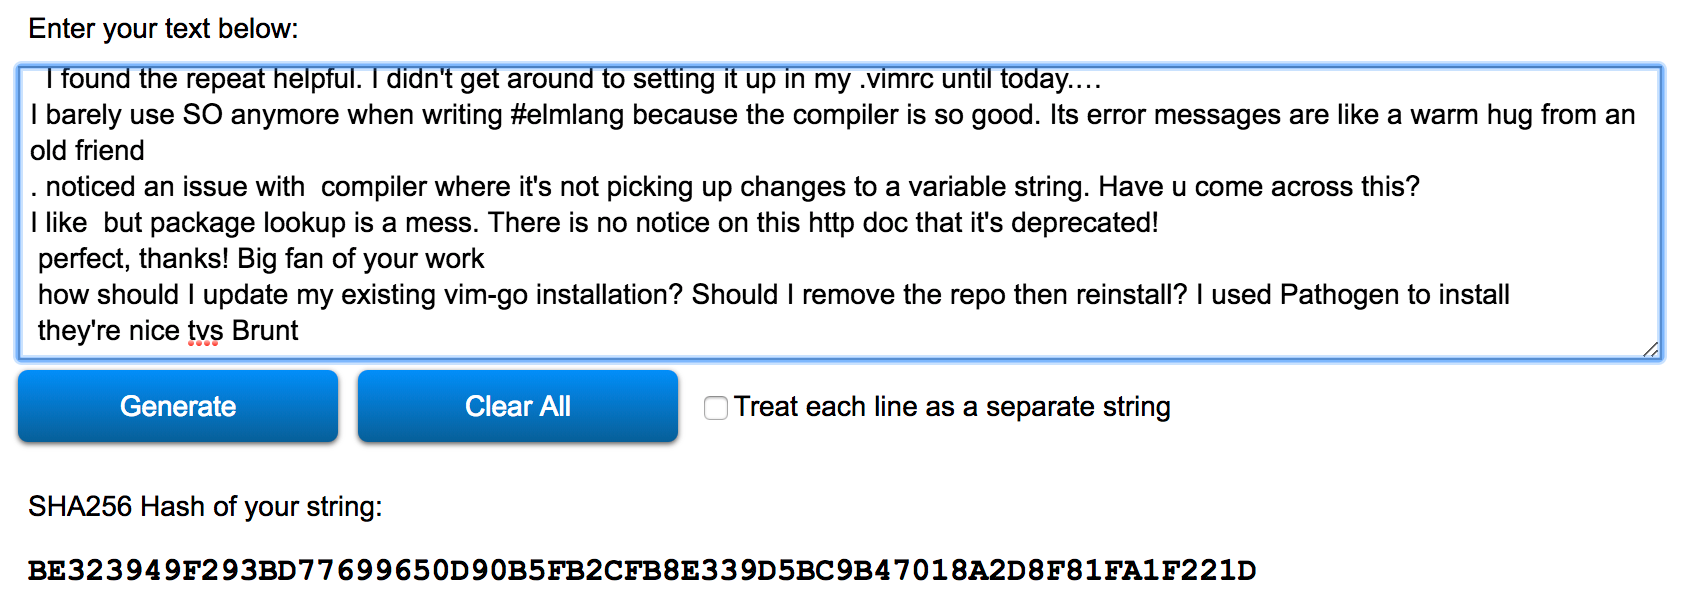
Let’s go ahead and convert the returned text in our test run to SHA256. Select all the text and copy it into any free, online SHA256 converter, like this one.
The SHA256 hash we get back is: BE323949F293BD77699650D90B5FB2CFB8E339D5BC9B47018A2D8F81FA1F221D

Now let’s record this hash on the blockchain. Just a quick note: you can record this SHA256 hash on any blockchain. You can add it to Ethereum if you already know a bit of Solidity. We’ll be proceeding with a simple Go-based demo blockchain from our other tutorials.
Blockchain
We’ve already modified the blockchain tutorial you read so instead of “BPM” you’re prompted to input a “TweetHash”. This means that each block we add to our blockchain will include the SHA256 hash we just generated. Once this SHA256 hash is on the blockchain, this set of Tweets from the user nosequeldeebee is now forever represented on the blockchain. Let’s do this now.
Go ahead and clone this repo and branch: https://github.com/mycoralhealth/blockchain-tutorial/tree/twitter
Navigate to the repo and go run main.go. When prompted, copy in the SHA256 hash we got from the online SHA256 converter. We can do this by sending a POST request to localhost:8080 with the body {“TweetHash”: “BE323949F293BD77699650D90B5FB2CFB8E339D5BC9B47018A2D8F81FA1F221D”}


Nice, the block with the hash is now immutably recorded on chain! Play around with some other Twitter users. Visit localhost with another Twitter handle, copy their Tweets, convert them to SHA256 and add them to the blockchain. Once you have a nice healthy chain of blocks, you’re done!
What does this mean?
If nosequeldeebee ever deletes one of their Tweets, or if they’re modified in any way, someone else will be able to prove that the Tweets have been tampered with, since the SHA256 hash of the new set of Tweets will not match the SHA256 hash of the old set. Pretty cool huh? When blocks are validated by other nodes, each of these nodes runs the original SHA256 calculation, agreeing that the SHA256 string does indeed represent the initial set of Tweets. All these nodes can now “prove” that the original set of Tweets was indeed from nosequeldeebee and if nosequeldeebee deletes any of them, all the nodes can “disprove” the assertion from the user that the Tweets were unaltered.
This is a classic example of how decentralization creates trust in a trustless system. None of these nodes know who nosequeldeebee is, none of these nodes know who any of the other nodes are, and nosequeldeebee has no idea who any of the nodes are. However, collectively, every party in this entire network can agree that nosequeldeebee produced a specific set of Tweets in a certain date range without relying on anyone else.
Data storage
What we haven’t talked about is where the actual Tweets get stored. If we ever wanted to read the Tweets that a SHA256 hash represents, we would need the unencrypted set of Tweets. SHA256 can’t work backwards, i.e. it is a one-way encryption algorithm.
So how can we store the Tweets in a decentralized manner off the blockchain? Remember, we don’t want to store it on chain because it’s too much data for the blockchain. The full answer to this question is a bit outside the scope of this tutorial but we wrote a previous one that shows you how to do it. IPFS is a decentralized storage protocol that is perfectly suited to what we want to do here.
Next steps
Great job! You successfully architected and implemented a real world use case of the blockchain in less than a few hundred lines of Go. Now you can tell everyone how currency based applications of the blockchain are actually pretty lame. There are so many cooler things you can do with the blockchain and what you’ve just built is a great start!
As a set of next steps, run through some of our tutorials linked below and build out your blockchain to include other peers. See if you can add some consensus algorithms to it as well.
Until next time, happy blockchain programming!
[ad_2]
This article has been published from the source link without modifications to the text. Only the head line has been changed.


